Welcome to What's My Job Today!!
This QuickStart will get you up and running in no time flat. But first of all- HELP! The HELP menu is always at the top right corner of your screen (once you are logged in). You can use this to contact customer support with any issues. We will also be happy to provide you with Team Setup Services- we can take an excel file and import all your Team Members, etc.

For Team Administrator Only: If you are the team's administrator and haven't already registered, please go to https://admin.whatsmyjobtoday.com/register to create your first team. The Admin Console (https://admin.whatsmyjobtoday.com/login) is where you can manage your team and team billing (credit card data). You must subscribe here and enter a valid credit card before your team is created. You may choose from a number of subscription plans. The Basic plan is a good place to start; we can always bill you separately for extra features (such as the ScheduleMaker service). If you are interested in one of the higher level plans, please contact us before signing up.
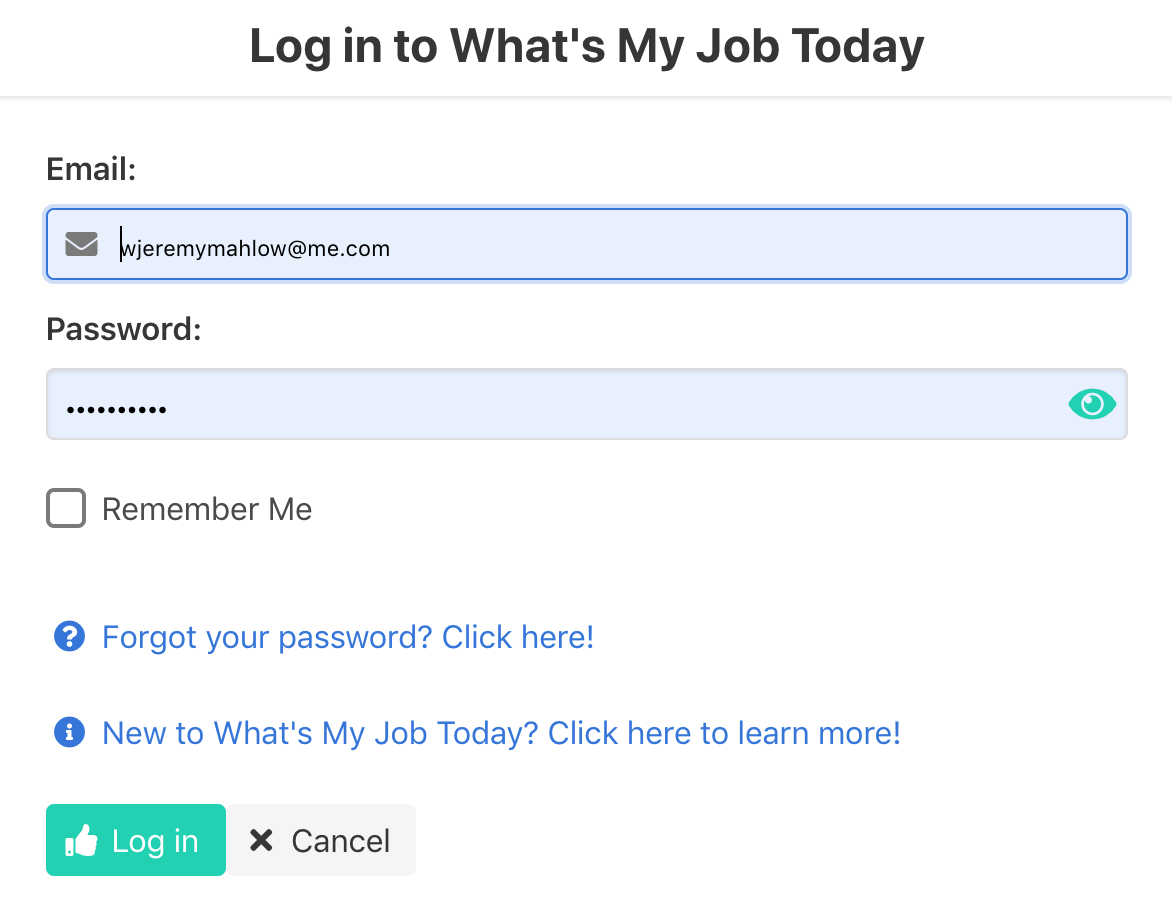
For All Team Members: To log in, go to https://whatsmyjobtoday.com/login and enter your username (email address) and password (it will be the same password you used on the Admin Console or a temporary password that we emailed you.) If you forgot your password, just click the Forgot Password link and a new one will be emailed to you.
What's My Job Today is based upon the concept of a Job (sometimes also called an Assignment). A Job is simply a Team Member's duty for that day. For example, a Job could be ONCALL - the Team Member would then be on "call" and available to answer phone messages, etc. A Job could also be "OFF" or "OUT" meaning that the Team Member is not working that day. You will be able to assign other Team Members to "cover" another Team Member with a certain Job (for example, a Team Member can cover another Team Member who is OUT).
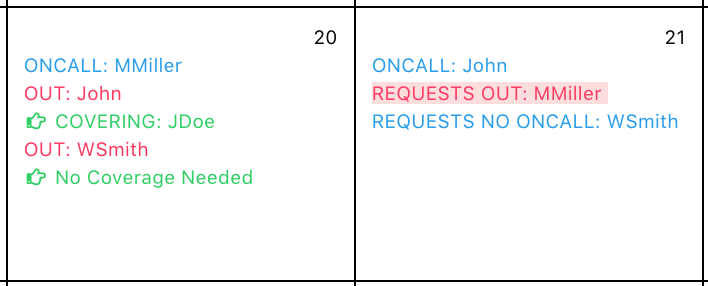
The calendar is organized into Events, Requests, Announcements, and Staff Requirements. An event (or assignment) is when a Team Member is assigned to a certain Job on a certain day. A Request is when a Team Member is requesting a certain job on a certain day (and you can also request an "OFF" Job if you created that Job). Team Members may also request NOT to have a job on a certain day. An Announcement is a general message (for example, "Office Closed") that will be emailed to all the Team Members on the day prior to the announcement (and it will also be displayed on the calendar). Finally, a Staff Requirement is an optional entry where Team Administrators can specify the number of Team Members needed to do a certain Job on a certain Day.

Once logged in, Team Administrators can add Team Members to the team. Select Team Members from the Manage Team menu. Click Add Team Member to add your first Team Member. You will be prompted for the email address. A few notes:
- You may either specify the user's new password or let us assign them a temporary password.
- Users may have Assistants. The Assitant can automatically receive notifications of calendar changes for the User. If your user doesn't have an assistant, just leave these fields blank.
- Make sure the "Team Member is actively participating" box is checked. If you uncheck this box, you will not be able to add new assignments for the Team Member to the calendar (but they will still be able to log in and view the calendar).
- The Title or Position field is for descriptive purposes only.
- You will specify the Team Member's role. Managers can approve and deny Requests (for example, requests for "OFF"). Administrators can also add and remove jobs and team members.
- Choose a unique Short Name and Initials for each team member. This will help display the calendar in a compact format.
- Choose whether you want the Team Member to receive SMS/Text alerts the morning of that assignment ("Alert: you have ONCALL Monday, July 1"). Please note that this only applies to jobs that have SMS/Text alerts turned on. You may also choose to receive SMS/Text alerts the day before the assignment for jobs that have this option enabled.
- Please choose whether you would like email reminders of your assignments the day before the assignment.
- Certain Team Members may want to be alerted of any change to the calendar within the near future (for instance, any change to any team member's assignments within 7 days).
- You should generally leave the "Enable receiving emails..." options in the Opt Out section checked.
- Once you are through creating your Team Member, they will receive an email with instructions on how to log in.

It's time to create some Jobs! A Job can be a certain duty (for example, "ONCALL") but it can also be any other type of event (for example, "OUT"). From the Manage Team menu, select Jobs. Click Add Job to enter the data.
- Most of these options are fairly self-explanatory, and you can always change them later. You can specify whether Team Members can add, delete, request, or swap their own assignments. Team Managers and Team Administrators can always do these things on behalf of any team member.
- Specify whether team members can recieve SMS/Text reminders the day of or the day before the assignment (at the time they set in their own Preferences). There are certain jobs (for example, OUT) where you do not want to send a SMS/Text on that day (for example, so your Team Member can sleep in!)
- You can specify that a Job needs Coverage. This will allow you to assign another Team Member to "cover" the Team Member with this job, and they can receive an email or text reminder about that event.
- Make sure to click that the job is active. Inactive jobs remain on the calendar but new assignments with that job can not be created.
- If you are going to use our ScheduleMaker Service, you can specify the maximum number of shifts to assign someone in a given length of time. For instance, if you want a team member to be assigned no more than three shifts per month, use 3 for the number of shifts and 30 for the number of days.
- If a job generally has a start and end time, you can specify the default times for that job here.
Once you have created Team Members and Jobs, you can add Events and Requests to the Calendar. Click on your Team Name at the top left corner of the menu to display this month's calendar. Hover over a day and click + Event (or + Ev if you are an Administrator). You may modify existing events just by clicking on them.
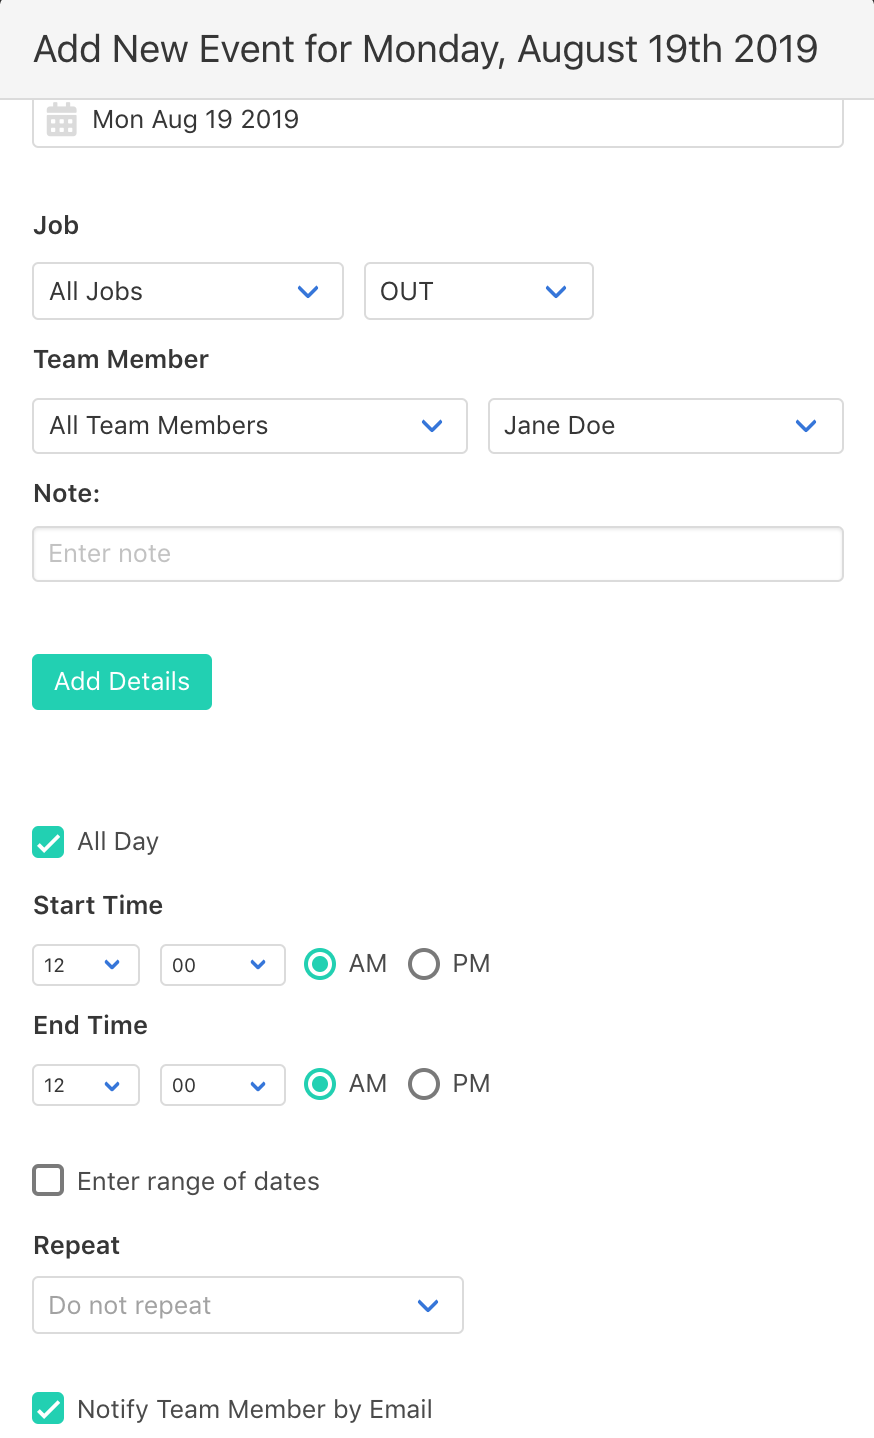
Here you will be able to select the Job and Team Member for the event. If the Job Type supports covering team members, you may assign someone to cover this event. You may also change the date, start/end time, and add a note or more extensive details. To make the event repeat every day for one week (for example, if the job is OUT and you want to mark the Team Member OUT for an entire week) click Enter Range of Dates and select the last day of the week. You may also select a Repeating Event Option to have the event automatically repeat every week, month, or year. When you delete one event that is part of a repeating event series (or range of dates), you will have the option to delete all future events in that series. By default, the Team Member(s) involved in this event will receive an email when it is added to the calendar. To disable this, uncheck the Notify By Email box at the bottom.
The day before an event, an email will be automatically sent out to each Team Member (and Covering Team Member) involved, unless they have email alerts turned off. Team Members may also receive SMS/Text alerts for events with Job Types that have that enabled.

To request an assignment, hover over the date you want and click + Request (or + Rq). The options here will be similar to Adding Events. You may check a box that says that you are requesting NOT to have this assignment on this day. The ScheduleMaker Service will not assign you this Job if you have added that to the calendar. You may also specify a Priority and a temporary Message to the Team Manager (these will be deleted when the request is approved.)
Team Managers and Administrators will receive weekly update emails about pending requests that have not been approved or denied. In addition, the total number of Pending Requests will appear at the bottom right of the screen for Team Managers and Administrators.

Team Managers and Administrators may click on a request to approve or deny that request. A dialog box will open allowing you to enter details for the approved event (or the reason for the denial). Once again, click on Notify By Email to alert the Team Member of your decision.

The final type of item that can be added to the calendar is the Announcement. Announcement alerts (for example, "Office Closed") will be emailed out to the entire team the day before the announcement.
Staff Requirements are used for calculating ScheduleMaker Schedules. If the number of Staff required for a Job varies from day to day, you can specify how many slots there are per day so that we can fill all of them when calculating your team's schedule. For example, if you are running a restaurant and normally need 2 waitresses on the weekdays but 4 waitresses on the weekends, you can add a Staff Requirement of 2 for the Waitress job on Monday - Friday and 4 on Saturday - Sunday. Please note that Staff Requirements are optional; if you always require the same amount of staff each day then there is no need to add Staff Requirements to the calendar.
If you do not specify a Staff Requirement on a particular day, we will assign one person to fill that job on that day. If you do not want any Team Members scheduled on that day, assign a Staff Requirement of 0 on that day.
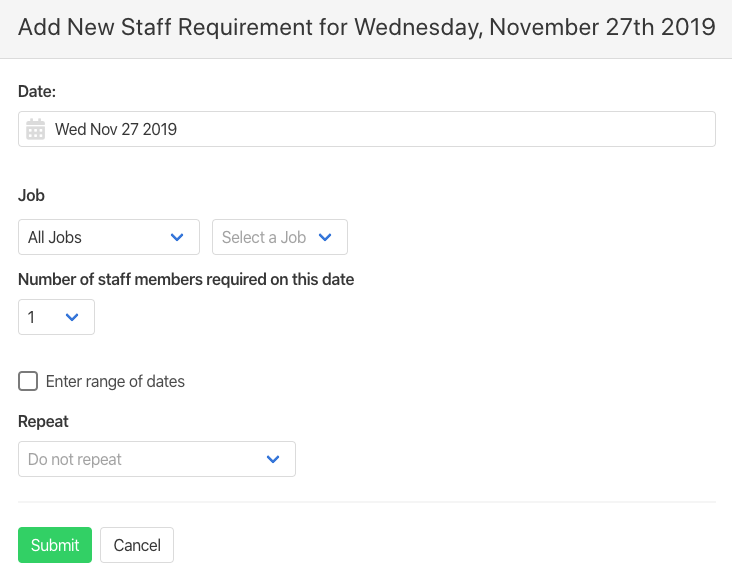
Staff Requirements are added and manipulated just like other calendar events. You can also add a repeating Staff Requirement.
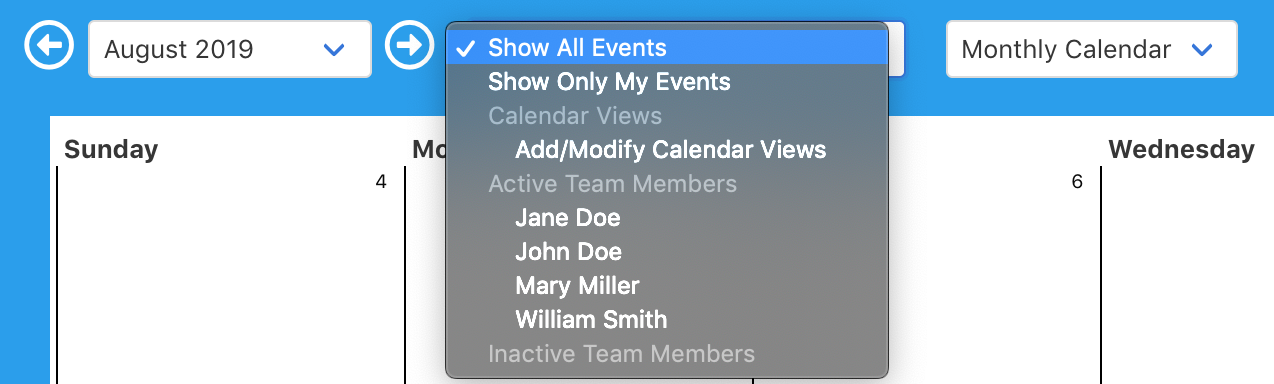
There are options for viewing the calendar near the top of the screen. You may view calendar events only for a certain Team Member by clicking Show All Events and then selecting that Team Member.

You may also select a Monthly, Daily, or Today display option for the calendar.
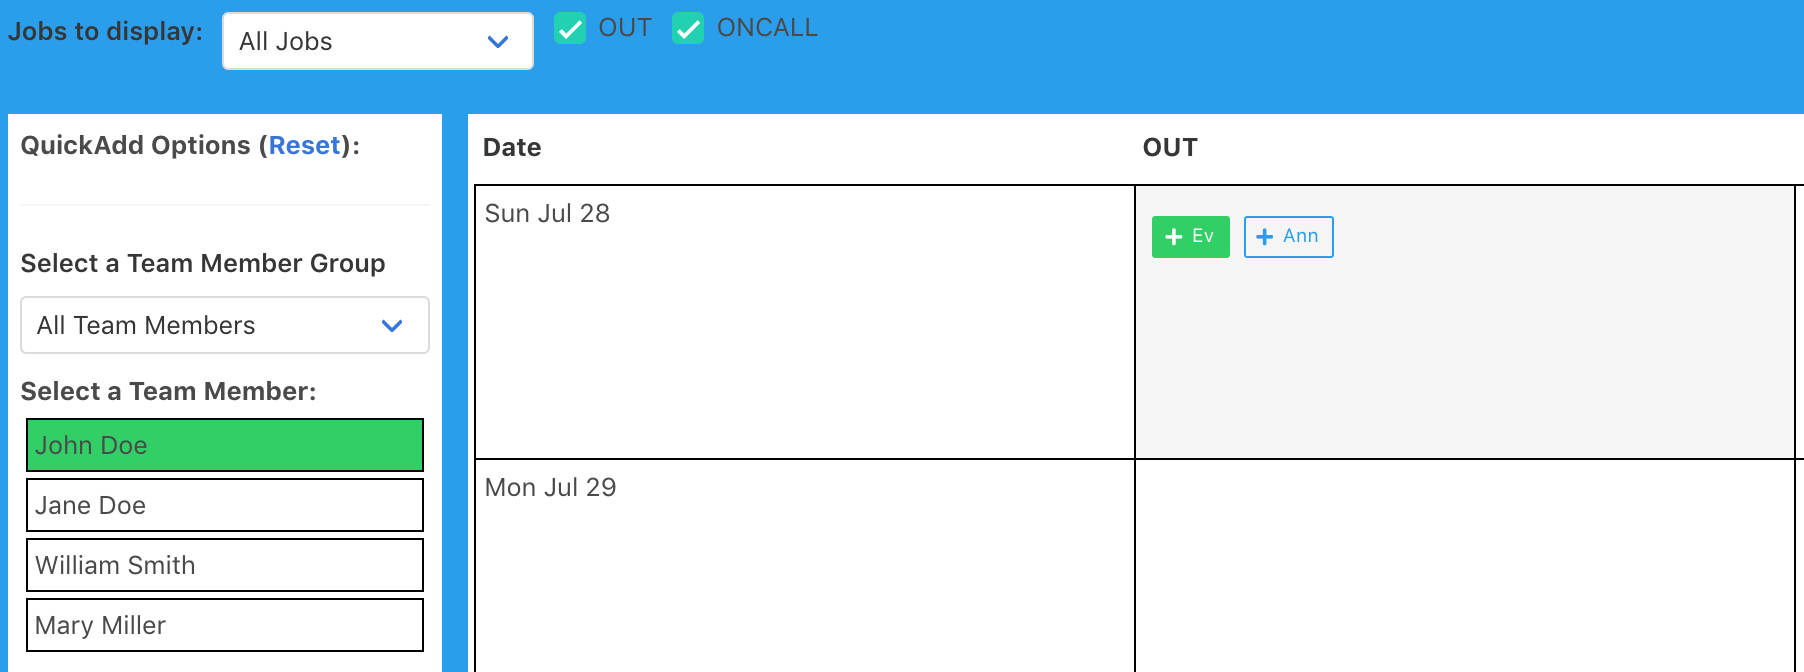
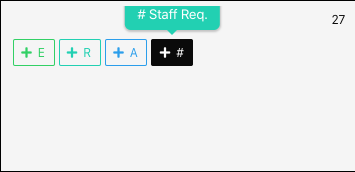
QuickAdd and QuickRemove are efficient ways to add/remove events in bulk. To do this, first select the Jobs from the checkboxes at the top of the screen. Then, select the Team Member from the column at the left of the screen (along with other details for the event). Hover over the date you want and the appropriate job column, and click + Event. The event will be added to the calendar in one click! You may want to leave the Notify By Email checkboxes UNCHECKED in the left sidebar.
To edit the details for an event, just click on it. A dialog box will allow you to change the date, time, details, or delete the event.

Team Members may adjust their User Profile by clicking Preferences at the top right corner of the screen. The options are similar to the options when you created a new Team Member.
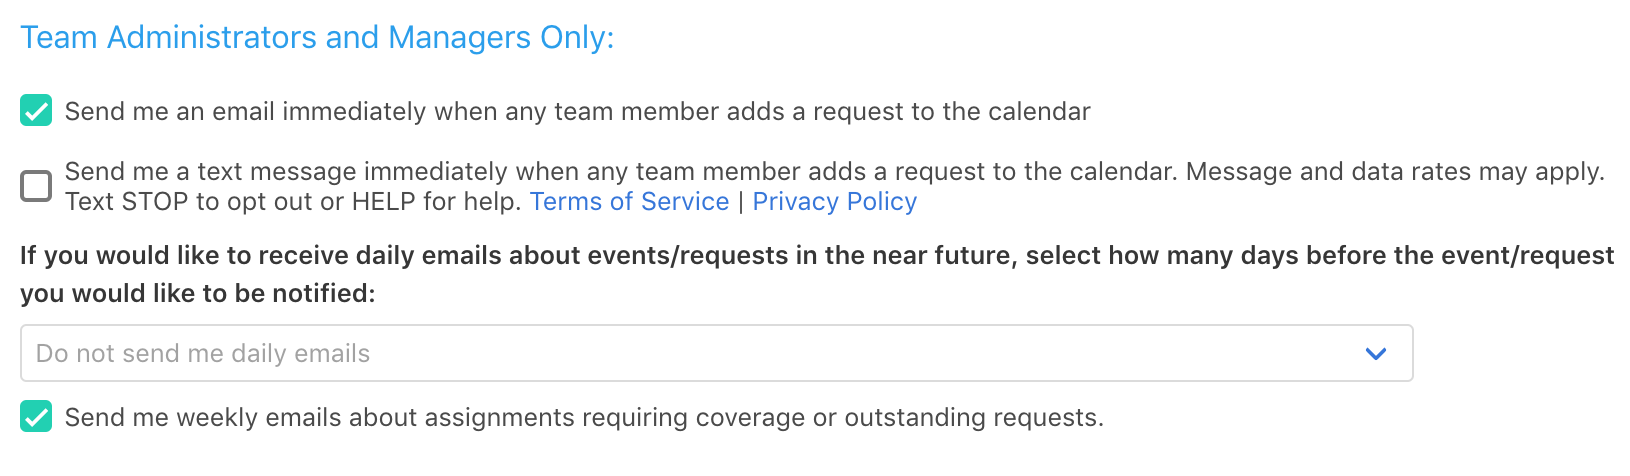
Team Managers and Administrators have a few extra options in the Preferences section: they can choose to recieve and email or SMS/Text message immediately when new requests are entered into the calendar, and they can recieve daily or weekly updates of pending requests or uncovered events.
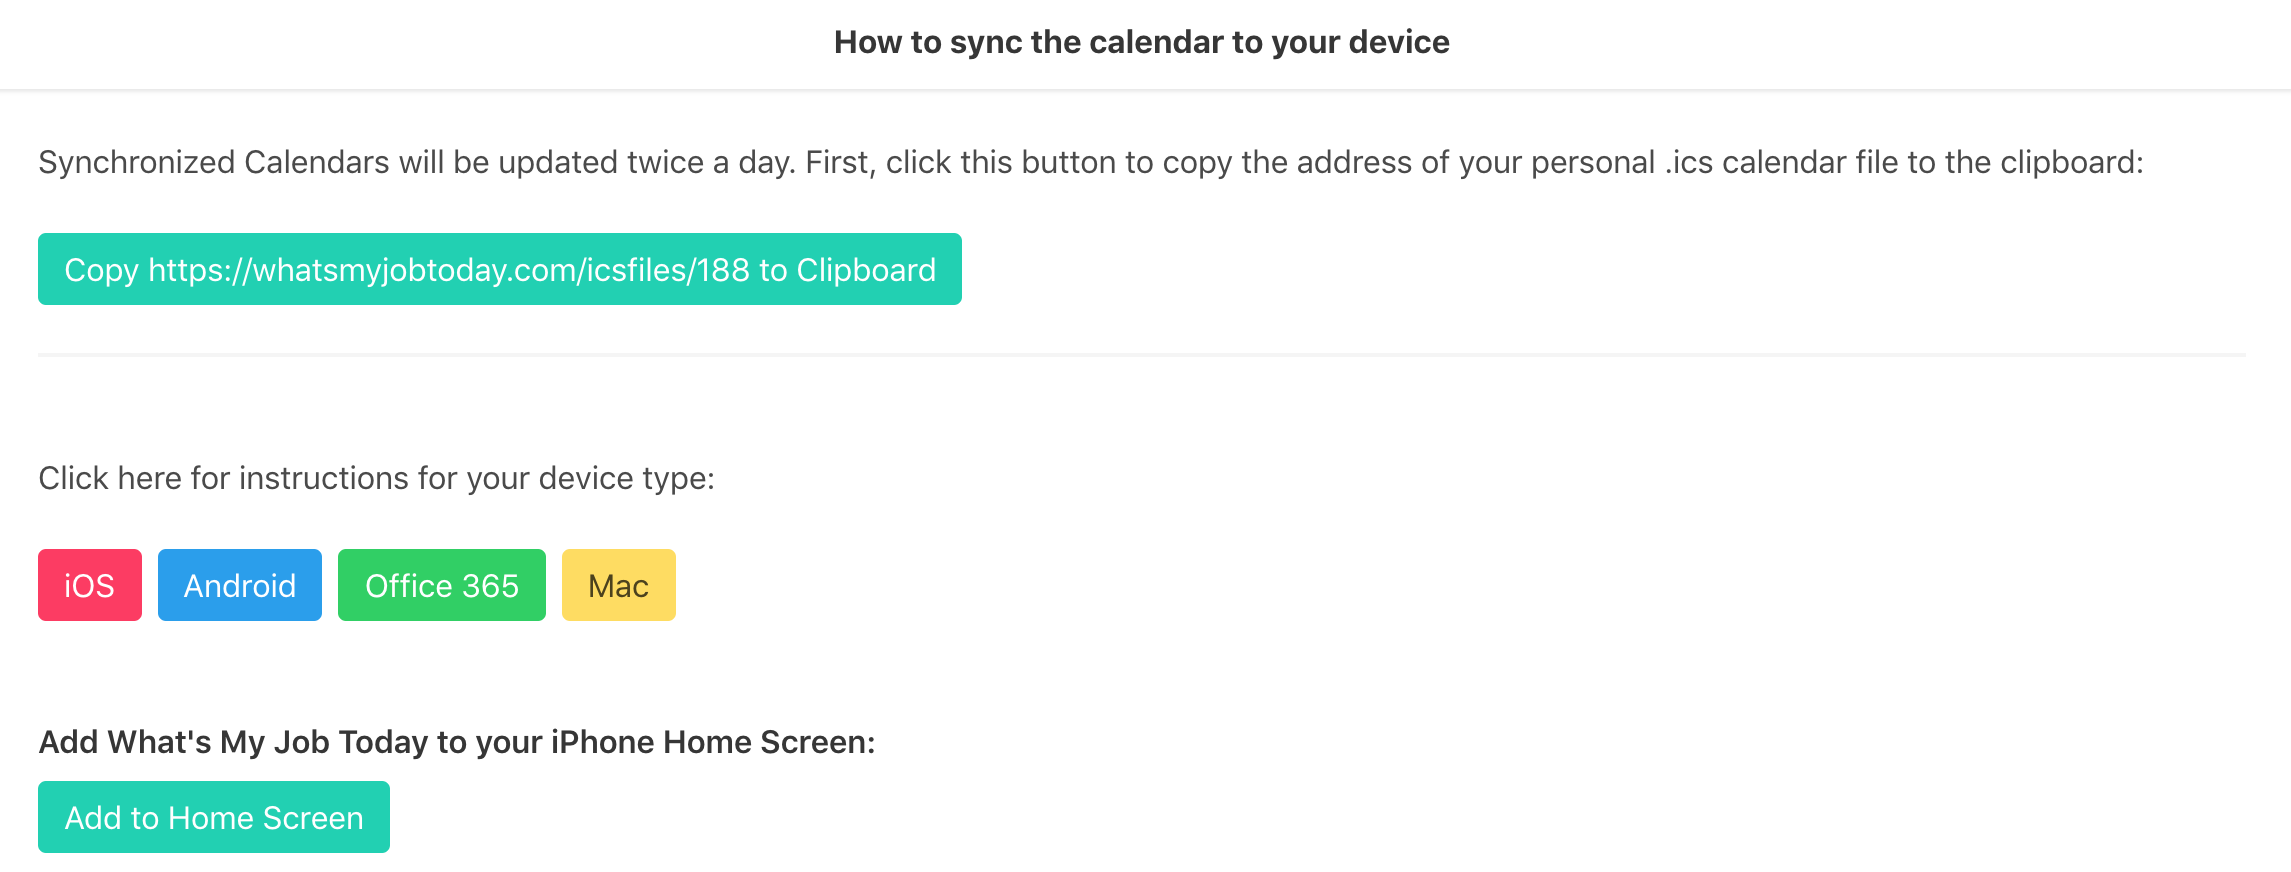
If you would like to sync your events to your personal smartphone or computer, choose Sync Calendar to Your Device from the Help menu at the top right of the screen. Here you may copy the .ics file (Internet Subscribed Calendar) address, and there are instructions for how to use that with various phones and operating systems.
If you are tired of spending hours and hours manually creating schedules for your team, consider using our ScheduleMaker Service. From the Manage Team menu, select ScheduleMaker. Here you will find details about your team's custom created schedules, or send us a message if you are interested in signing up for this service. Our team will guide you through the process of approving/denying requests and then using computer algorithms to create a schedule that gives everyone an equal share of assignments while keeping customized ScheduleMaker Rules that you will set for your team (for instance, avoiding doing a certain Job two days in a row).
This concludes the QuickStart Tutorial. Happy Scheduling!
Once you have created Team Members and Jobs, you can add Events and Requests to the Calendar. Click on your Team Name at the top left corner of the menu to display this month's calendar. Hover over a day and click + Event (or + Ev if you are an Administrator). You may modify existing events just by clicking on them.
Here you will be able to select the Job and Team Member for the event. If the Job Type supports covering team members, you may assign someone to cover this event. You may also change the date, start/end time, and add a note or more extensive details. To make the event repeat every day for one week (for example, if the job is OUT and you want to mark the Team Member OUT for an entire week) click Enter Range of Dates and select the last day of the week. You may also select a Repeating Event Option to have the event automatically repeat every week, month, or year. When you delete one event that is part of a repeating event series (or range of dates), you will have the option to delete all future events in that series. By default, the Team Member(s) involved in this event will receive an email when it is added to the calendar. To disable this, uncheck the Notify By Email box at the bottom.
The day before an event, an email will be automatically sent out to each Team Member (and Covering Team Member) involved, unless they have email alerts turned off. Team Members may also receive SMS/Text alerts for events with Job Types that have that enabled.
To request an assignment, hover over the date you want and click + Request (or + Rq). The options here will be similar to Adding Events. You may check a box that says that you are requesting NOT to have this assignment on this day. The ScheduleMaker Service will not assign you this Job if you have added that to the calendar. You may also specify a Priority and a temporary Message to the Team Manager (these will be deleted when the request is approved.)
Team Managers and Administrators will receive weekly update emails about pending requests that have not been approved or denied. In addition, the total number of Pending Requests will appear at the bottom right of the screen for Team Managers and Administrators.
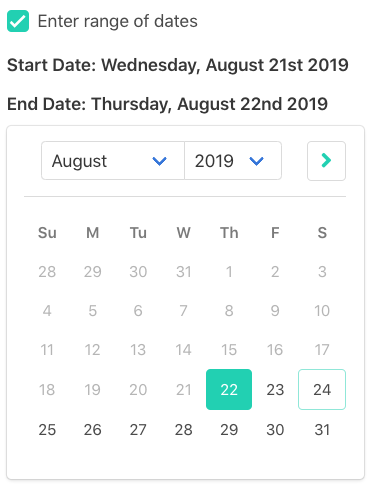
You may click "Enter range of dates" to make a calendar item repeat every day for a specified amount of time. Enter the End Date and a series of calendar items will be added to the calendar. If you have a Job named OUT, a team member could mark themselves OUT for an entire week using this method.
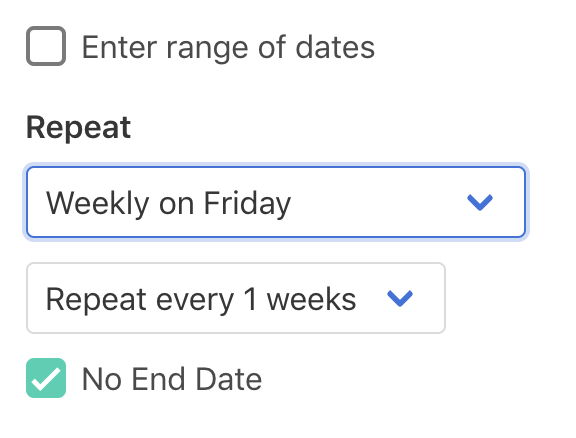
To make an item repeat every week or month, select one of the Repeat Options when adding the item to the calendar. You can specify an end date or click No End Date to have the item repeat indefinitely.
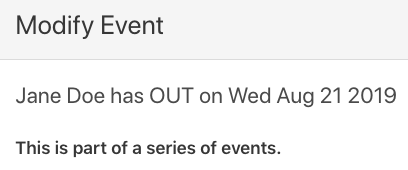
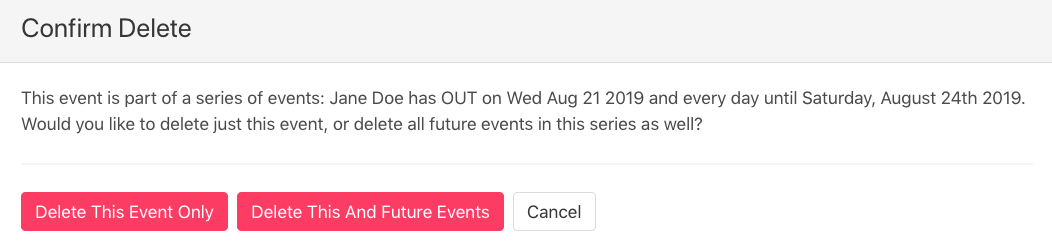
When you click on an item that is part of a repeating series of items, you will see this description. When you modify or delete this item, you will be asked if you would like to modify/delete this item only, or all items in the series.
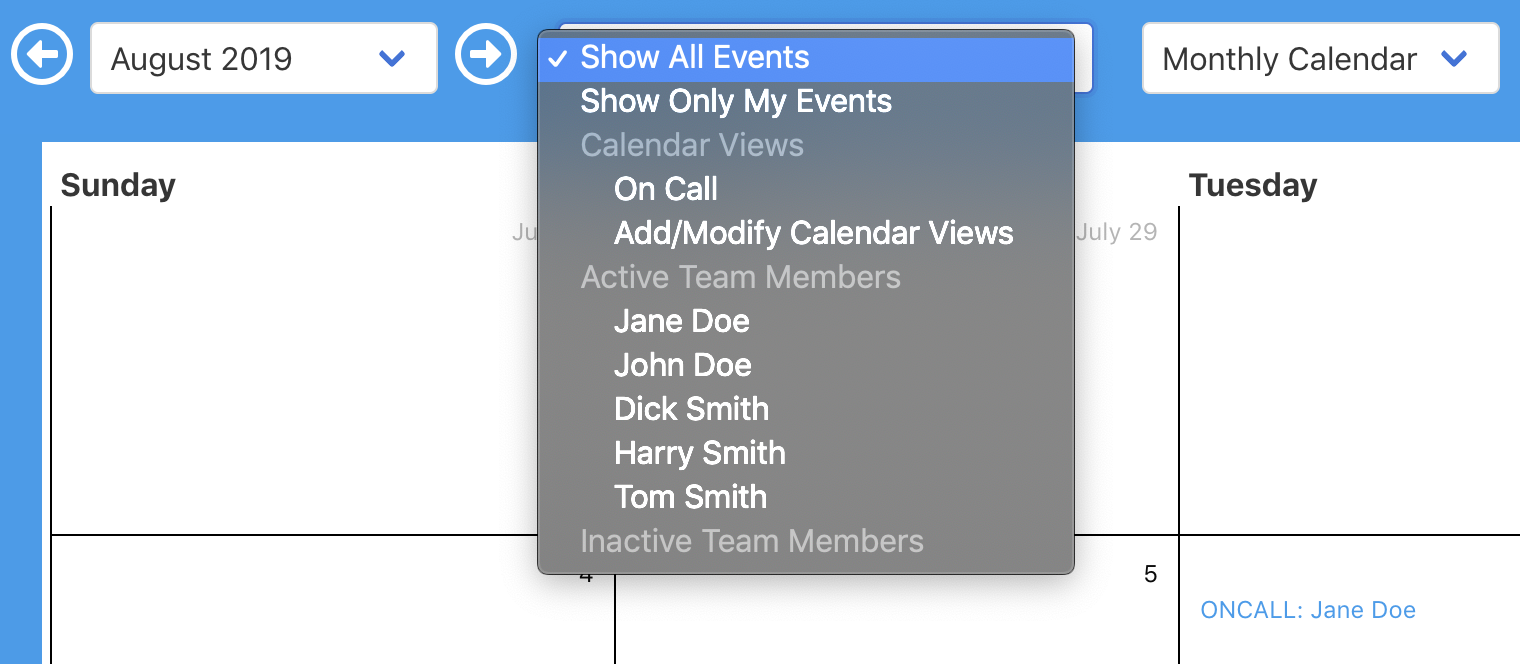
You may choose to filter the calendar to display only certain Team Members, or an Administrator may create a Calendar View that displays only certain Team Members and certain Jobs.

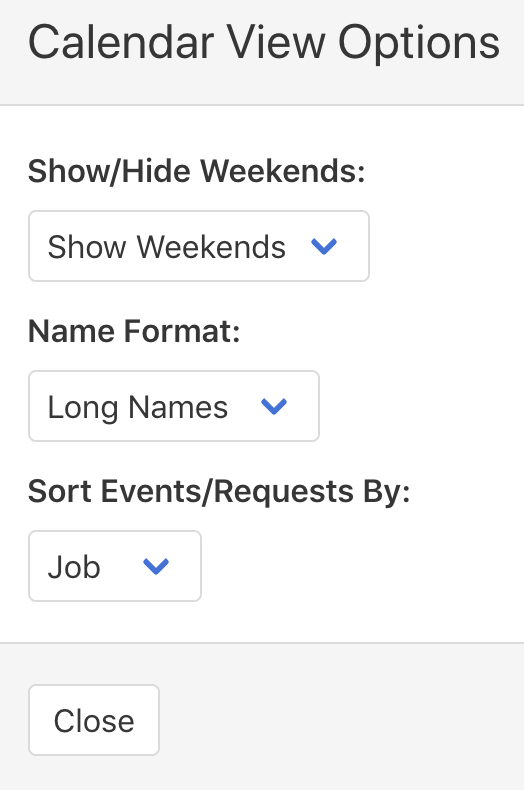
When viewing the calendar, you may click the Display Options button at the top right of the calendar to adjust Calendar View Options. From here you can choose whether to show weekend days and the format of Team Member names (Full names, short names, or just initials). You can specify whether to prioritize sorting events by the job tag or by the time of the event.

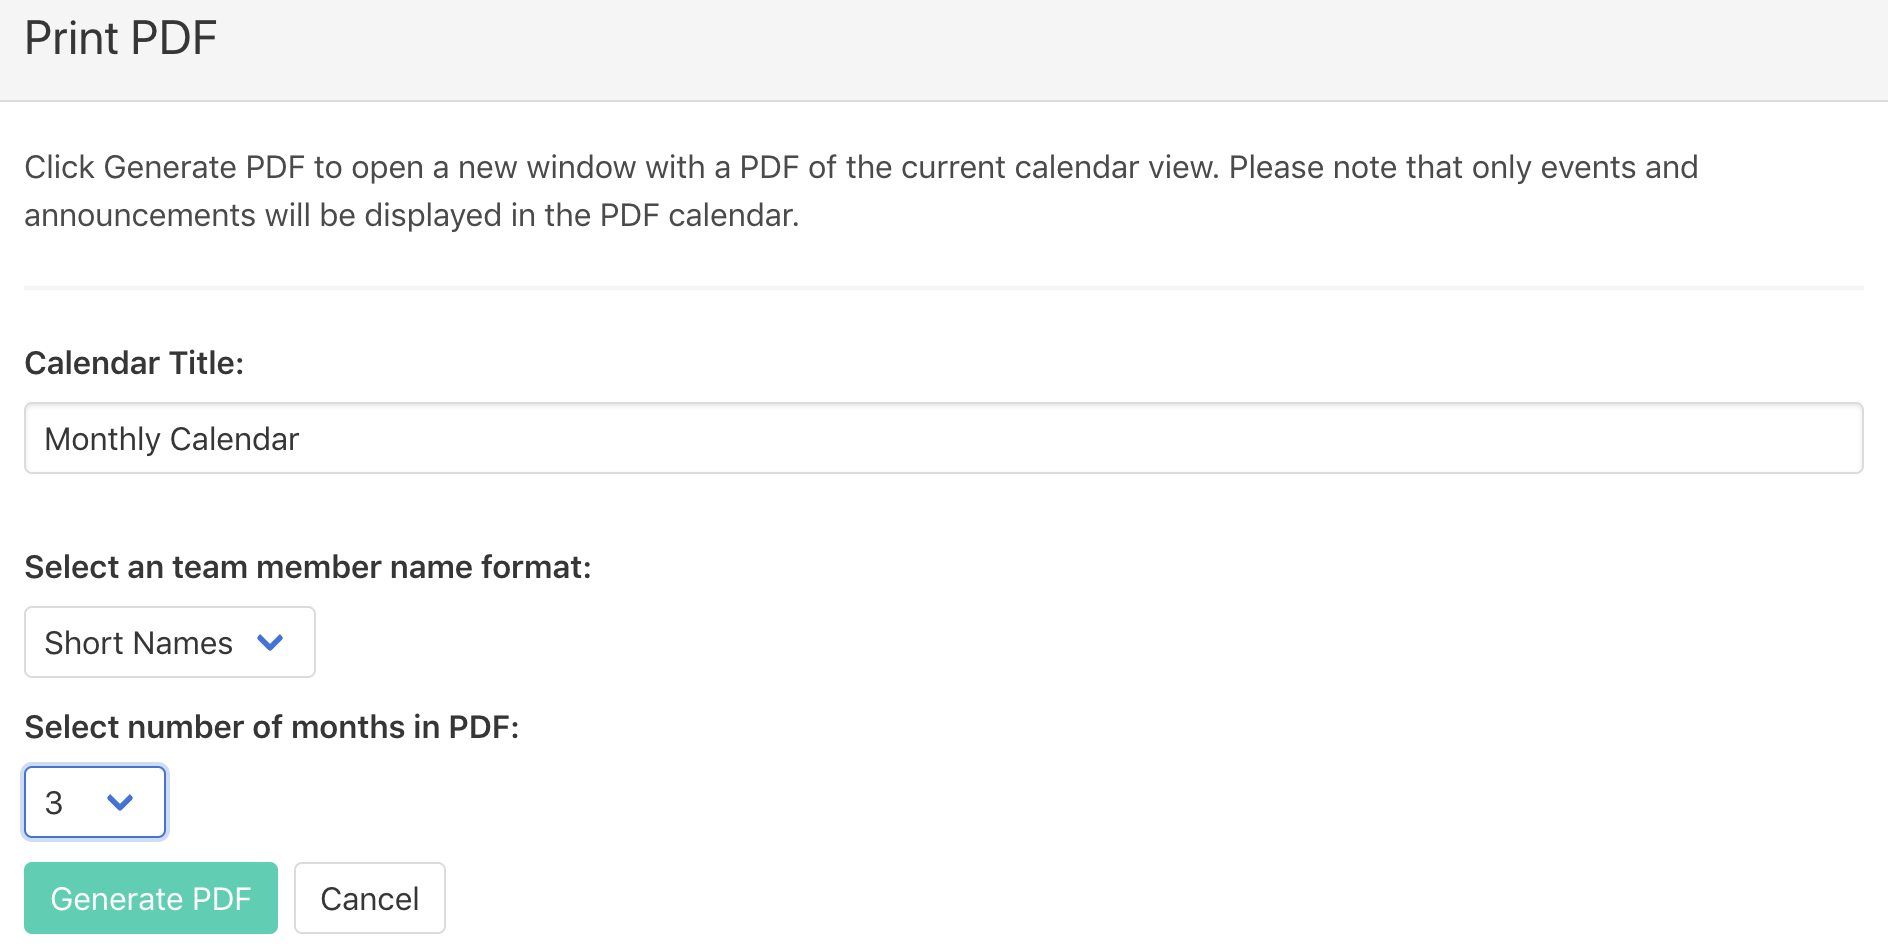
You may download a PDF file of the currently displayed calendar by clicking on the PDF button at the top right of the calendar. Only the events that are currently displayed on your screen will be shown. Choose the number of months to print and the name of the file. It may be useful to email a PDF copy of the calendar to your Team Members.
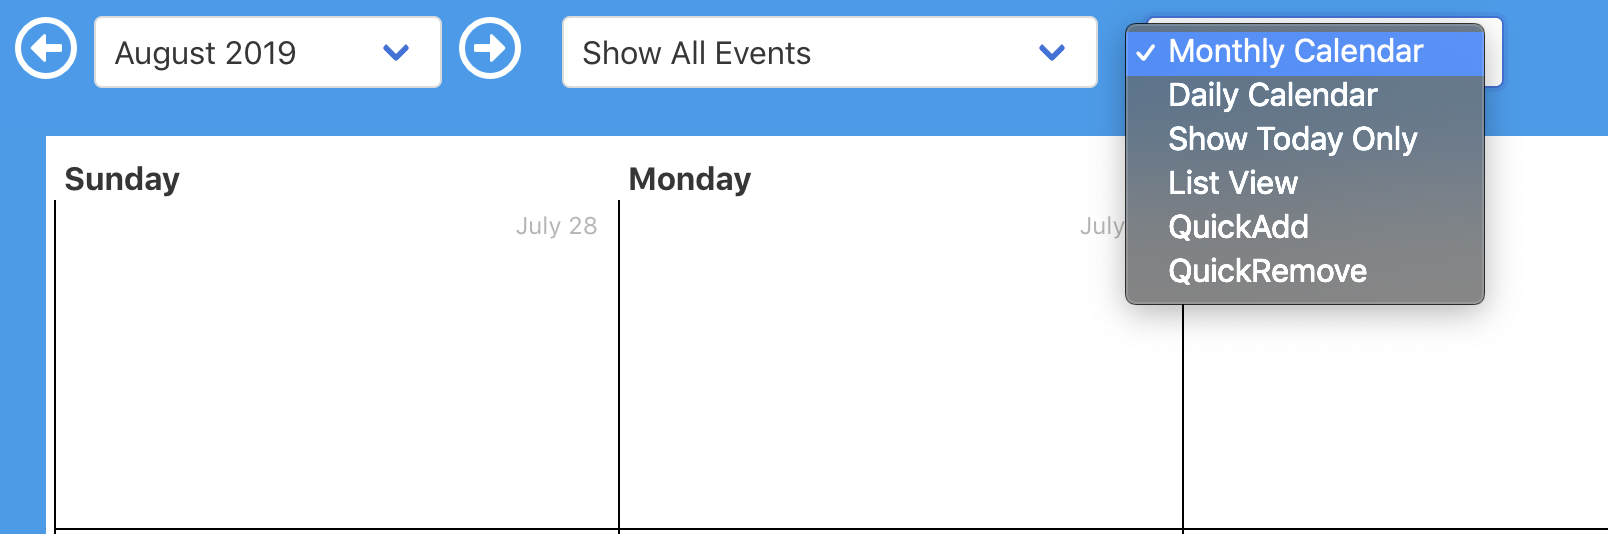
You may choose to view a Monthly Calendar, Daily Calendar, or Today View.
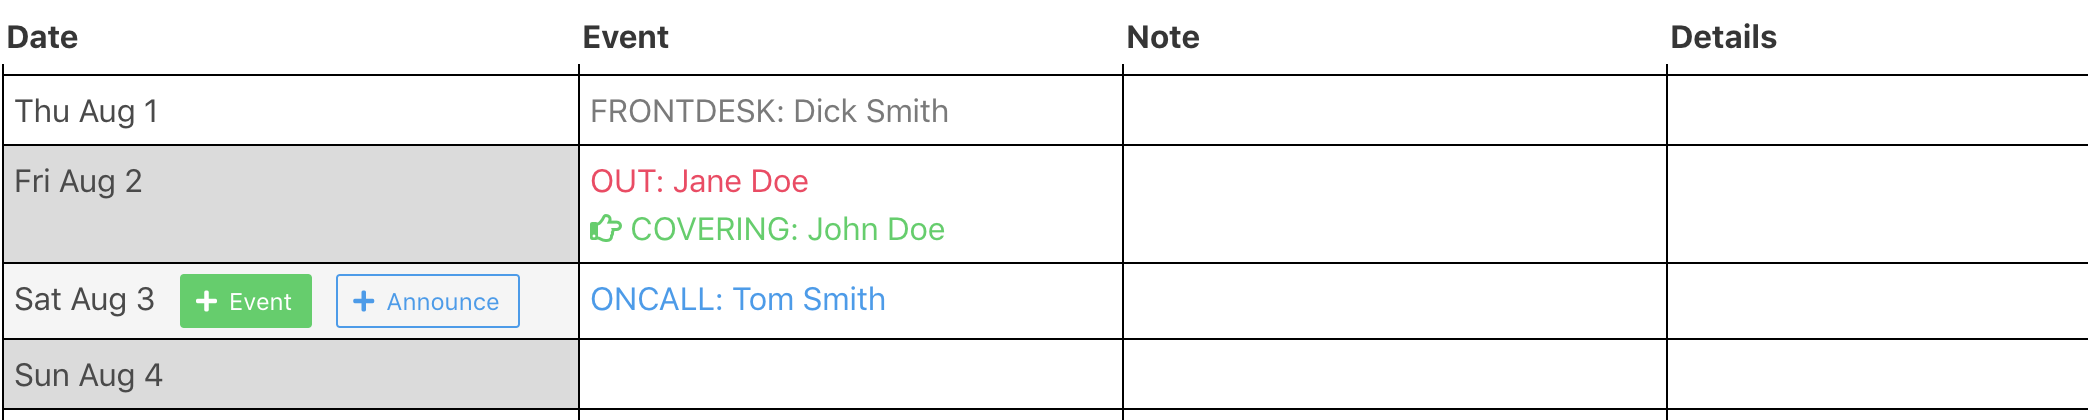
The List View shows one calendar event or request per line. To add a new item, hover your mouse in the left hand column that displays the date. You may quickly edit the notes or details for a particular item simply by clicking the mouse in the notes or details column.
QuickAdd and QuickRemove are efficient ways to add/remove events in bulk. To do this, first select the Jobs from the checkboxes at the top of the screen. Then, select the Team Member from the column at the left of the screen (along with other details for the event). Hover over the date you want and the appropriate job column, and click + Event. The event will be added to the calendar in one click! You may want to leave the Notify By Email checkboxes UNCHECKED in the left sidebar.
To edit the details for an event, just click on it. A dialog box will allow you to change the date, time, details, or delete the event.
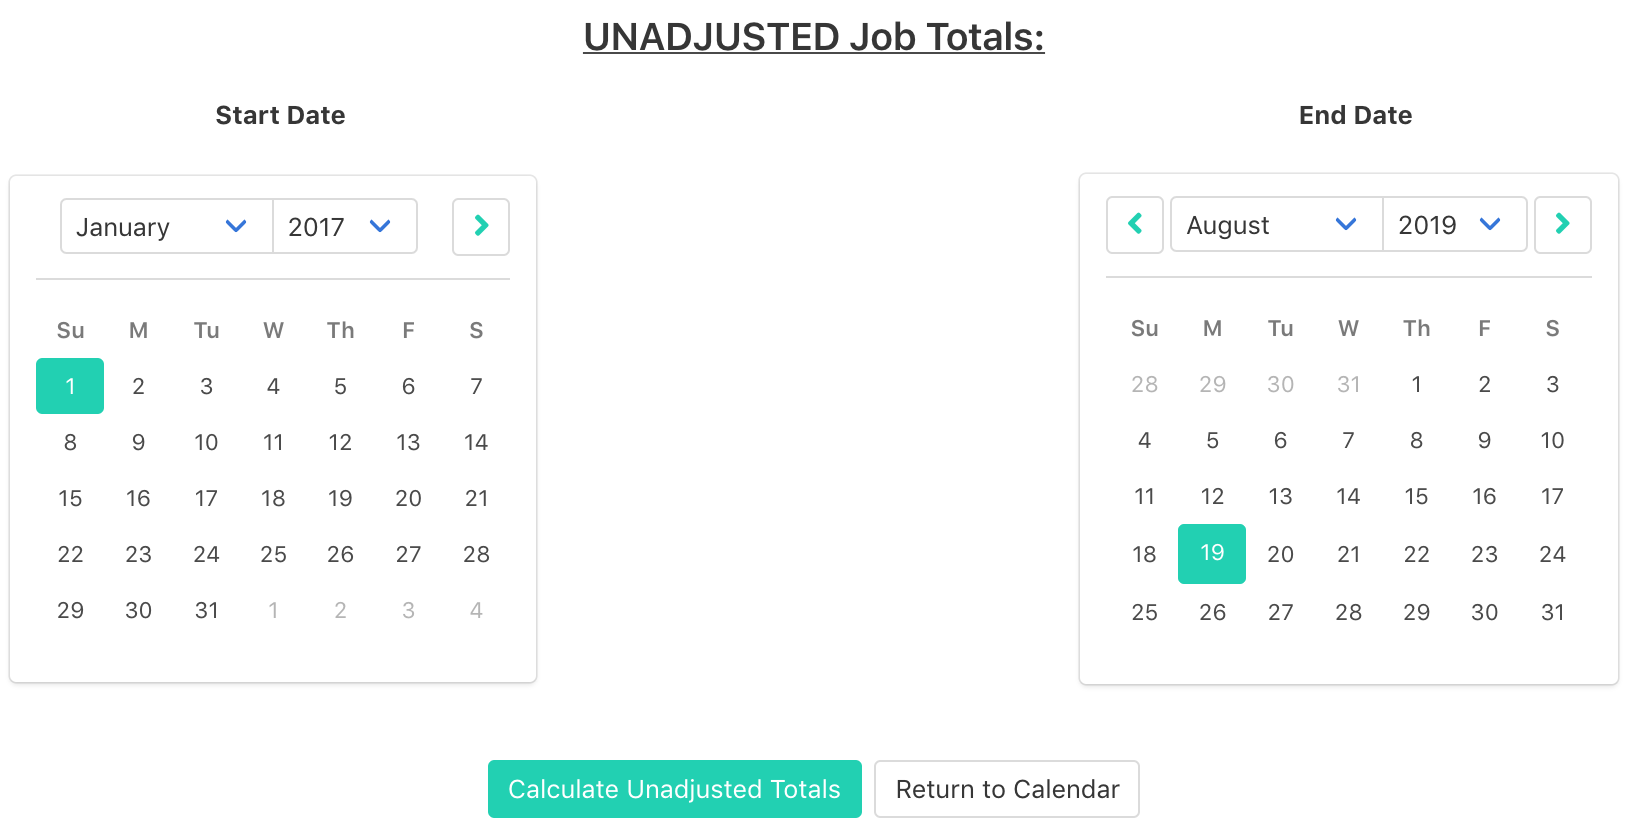
Any Team Member can view the Job Totals for the team. A Job Total is the total amount of time the Team Member has been assigned that particular job in the dates you specify. Adjusted Job Totals are the total amount of time since the calendar began, plus or minus any offsets you assign that team member.
Adjusted Job Totals are used for calculating ScheduleMaker Schedules. For example, suppose that every month you are making a schedule for the Job "ONCALL," and you want every Team Member to be assigned an equal number of shifts over time. If a Team Member has recently joined the team, you will need to give them "credit" for the time the other Team Members have been doing ONCALL shifts (if each Team Member has already done about 5 shifts, and the new Team Member has done 0 shifts, you will want to give the new Team Member an "offset" of 5 shifts before the next month of the schedule is created).

John is on call August 7th but he would like to swap his call with Jane (who is on call August 6th). First, the Team Administrator needs to make sure that the ONCALL job has the Swap Request Option activated (go to Manage Team -> Jobs and edit the options for the ONCALL Job.) To do this, John should click on BOTH EVENTS and choose "Request Swap."
After John clicks on the FIRST event he should choose Start a New Swap Request. He can enter a reason for the request that will be sent to Jane.
John then clicks on the SECOND event and chooses Request Swap. Then, pick the FIRST event from the "Select an option" dropdown. Jane and John will then receive emails every day until this Swap Request is accepted or rejected.
Now we are logged in as Jane. There is a bell icon next to the Team Name in the menu at the top of the screen. Select Swap Requests from this dropdown menu.

On this page are listed the Incoming, Outgoing, and Recent Swap Requests. Jane may click Accept or Reject on this request. If John goes to this webpage, he may delete or modify the request from here (it would be listed as an Outgoing request for John).

Team Administrators may edit the options for the ONCALL Job in the Manage Team -> Jobs menu. You may choose whether a Swap requires approval by a Team Manager or Administrator. If a Swap Request requires approval, the Team Administrators and Managers will recieve an email once Jane accepts the request, and they can approve Swap Requests for the entire team by selecting "Swap Requests for Entire Team" from the Manage Team menu.
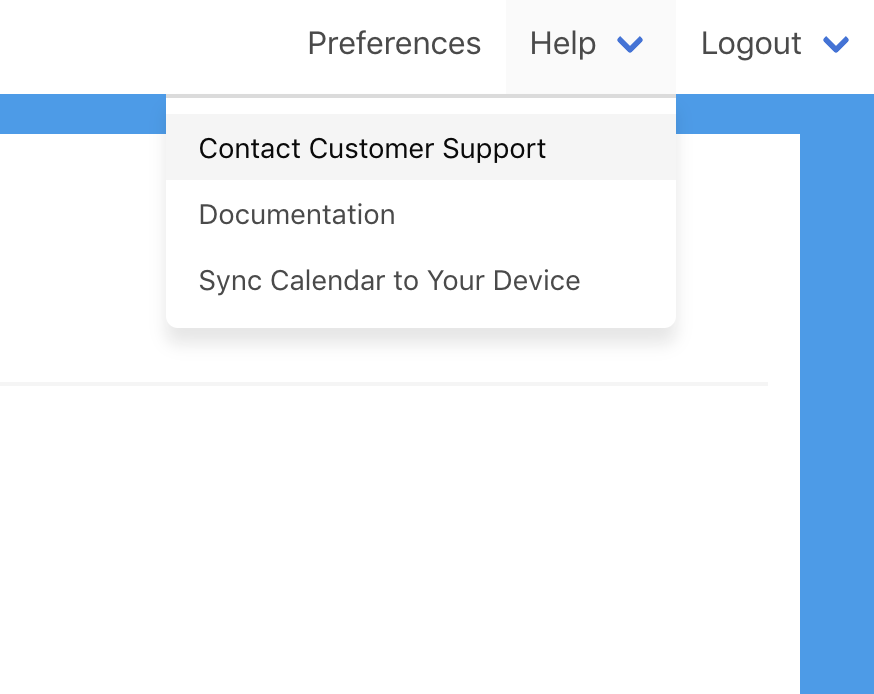
The Help menu is available at the top right corner of the screen.
From here, you can type your question or request and click Contact Customer Support. If there is an urgent matter, just check the box next to "This is an urgent request."
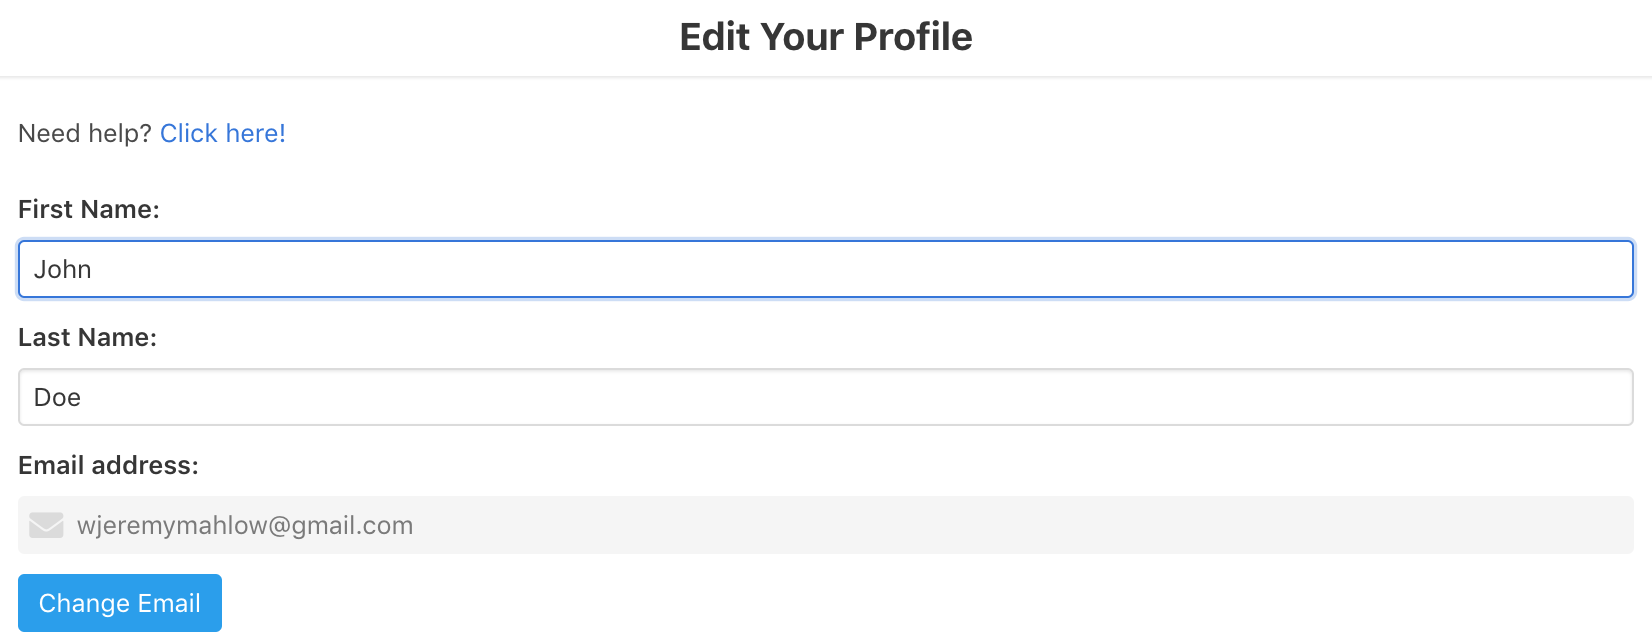
Click the Preferences link in the Menu at the top right of the screen to adjust your settings. A few notes:
- You may enter information for an assistant (with their permission). The Assitant can automatically receive notifications of your calendar changes. If you don't have an assistant, just leave these fields blank.
- Make sure the "Team Member is actively participating" box is checked. If you uncheck this box, you will not be able to add new items to the calendar (although you will still be able to log in and view the calendar).
- The Title or Position field is for descriptive purposes only.
- Each Team Member has a role. Managers can approve and deny Requests (for example, requests for "OFF"). Administrators can also add and remove jobs and team members.
- Each team member must have a unique Short Name and Initials. This will help display the calendar in a compact format.
- Choose whether you want to receive SMS/Text alerts the morning of that assignment ("Alert: you have ONCALL Monday, July 1"). Please note that this only applies to jobs that have SMS/Text alerts turned on. You may also choose to receive SMS/Text alerts the day before the assignment for jobs that have this option enabled.
- Please choose whether you would like email reminders of your assignments the day before the assignment.
- Certain Team Members may want to be alerted of any change to the calendar within the near future (for instance, any change to any team member's assignments within 7 days).
- Your team may enable some custom fields at the bottom of the screen.
- You should generally leave the "Enable receiving emails..." options in the Opt Out section checked.
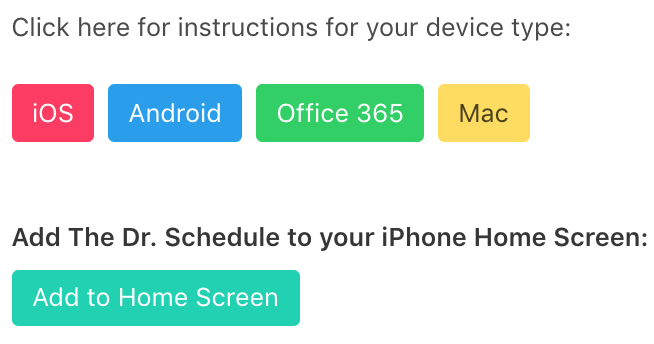
To learn how to sync your online calendar to your smartphone or computer, select Sync Calendar to your device from the Help menu at the top right of your screen.
This section also contains instructions on how to add your team calendar as a button to your smartphone or tablet's home screen.
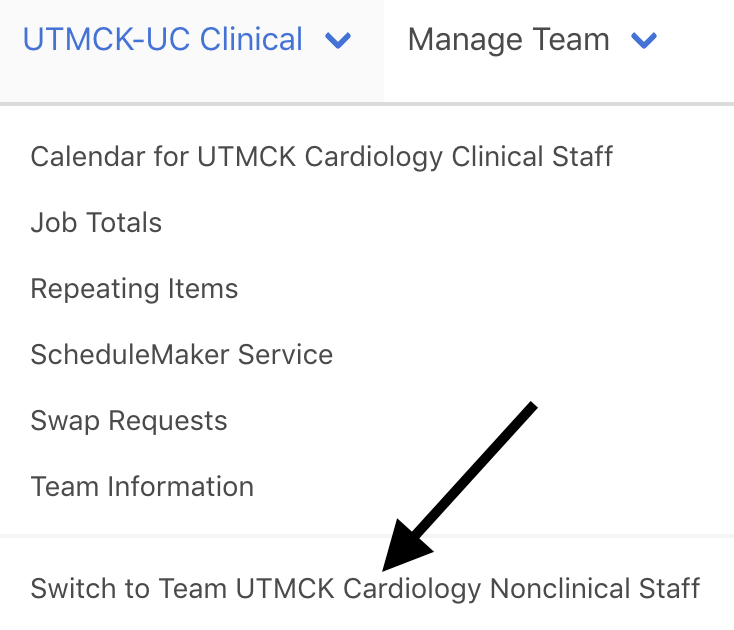
Users can belong to multiple teams on What's My Job Today.
The currently selected team is displayed in the top left corner of the screen in the Menu. To change your currently selected team, hover over this menu and select the new team from the dropdown menu.
When you click on certain links (including your Preferences), certain options only apply to the currently selected team.
The final type of item that can be added to the calendar is the Announcement. Announcement alerts (for example, "Office Closed") will be emailed out to the entire team the day before the announcement.
Team Members that are not Managers or Administrators have limited abilities to edit the calendar. You may change the options for a Job and specify whether Team Members may add, update, or delete their own assignments involving that Job.
Team Managers and Administrators can edit other Team Members' assignments just by clicking on them.
Team Managers and Administrators may click on a request to approve or deny that request. A dialog box will open allowing you to enter details for the approved event (or the reason for the denial). Once again, click on Notify By Email to alert the Team Member of your decision.
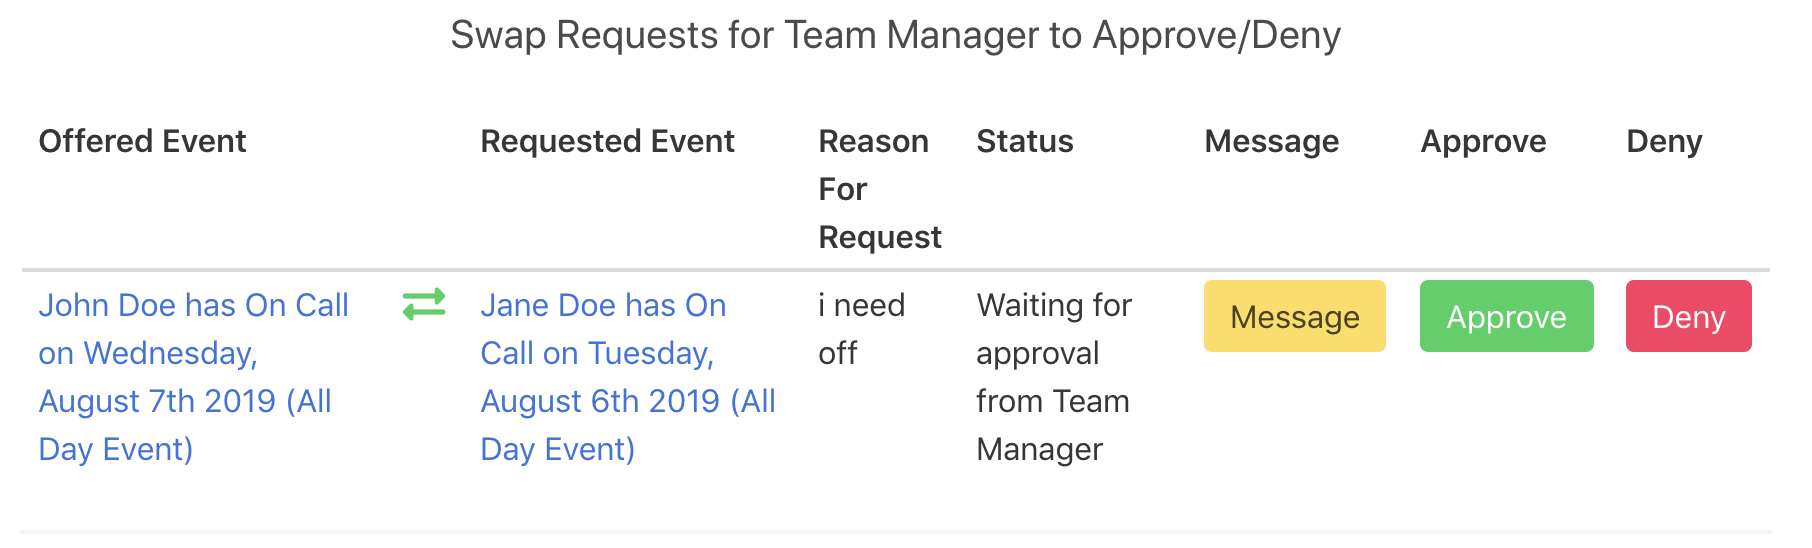
Team Managers and Administrators will receive an email when a swap request requires approval. You may access the swap requests for the team (as opposed to your personal swap requests) by selecting Swap Requests for Entire Team from the Manage Team menu.
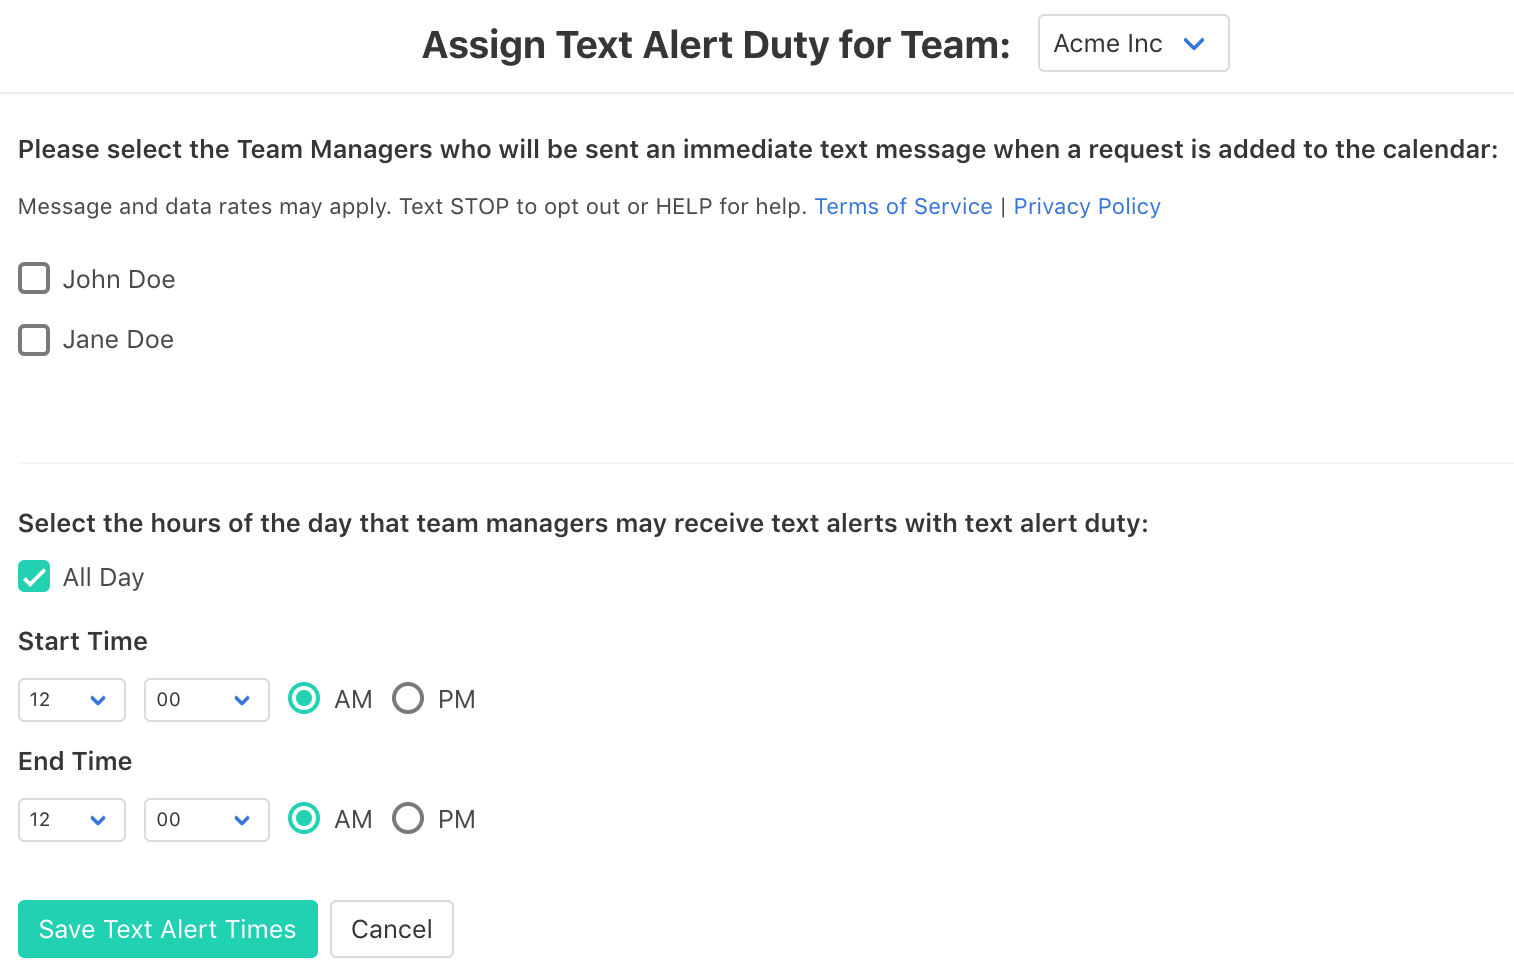
Text Alert Duty can be activated by Team Administrators clicking on Team Settings from the Manage Team menu. Team Administrators and Managers can then go to Text Alert Duty from the Manage Team menu and choose a Team Administrator/Manager to receive immediate SMS/Text message alerts when anyone adds a request to the calendar. More than one Team Administrator/Manager can be selected.
This feature is designed for teams where a quick response to requests is required.
You may also specify the hours of the day to enable this feature (to prevent Team Administrators/Managers from being texted at night, for example).
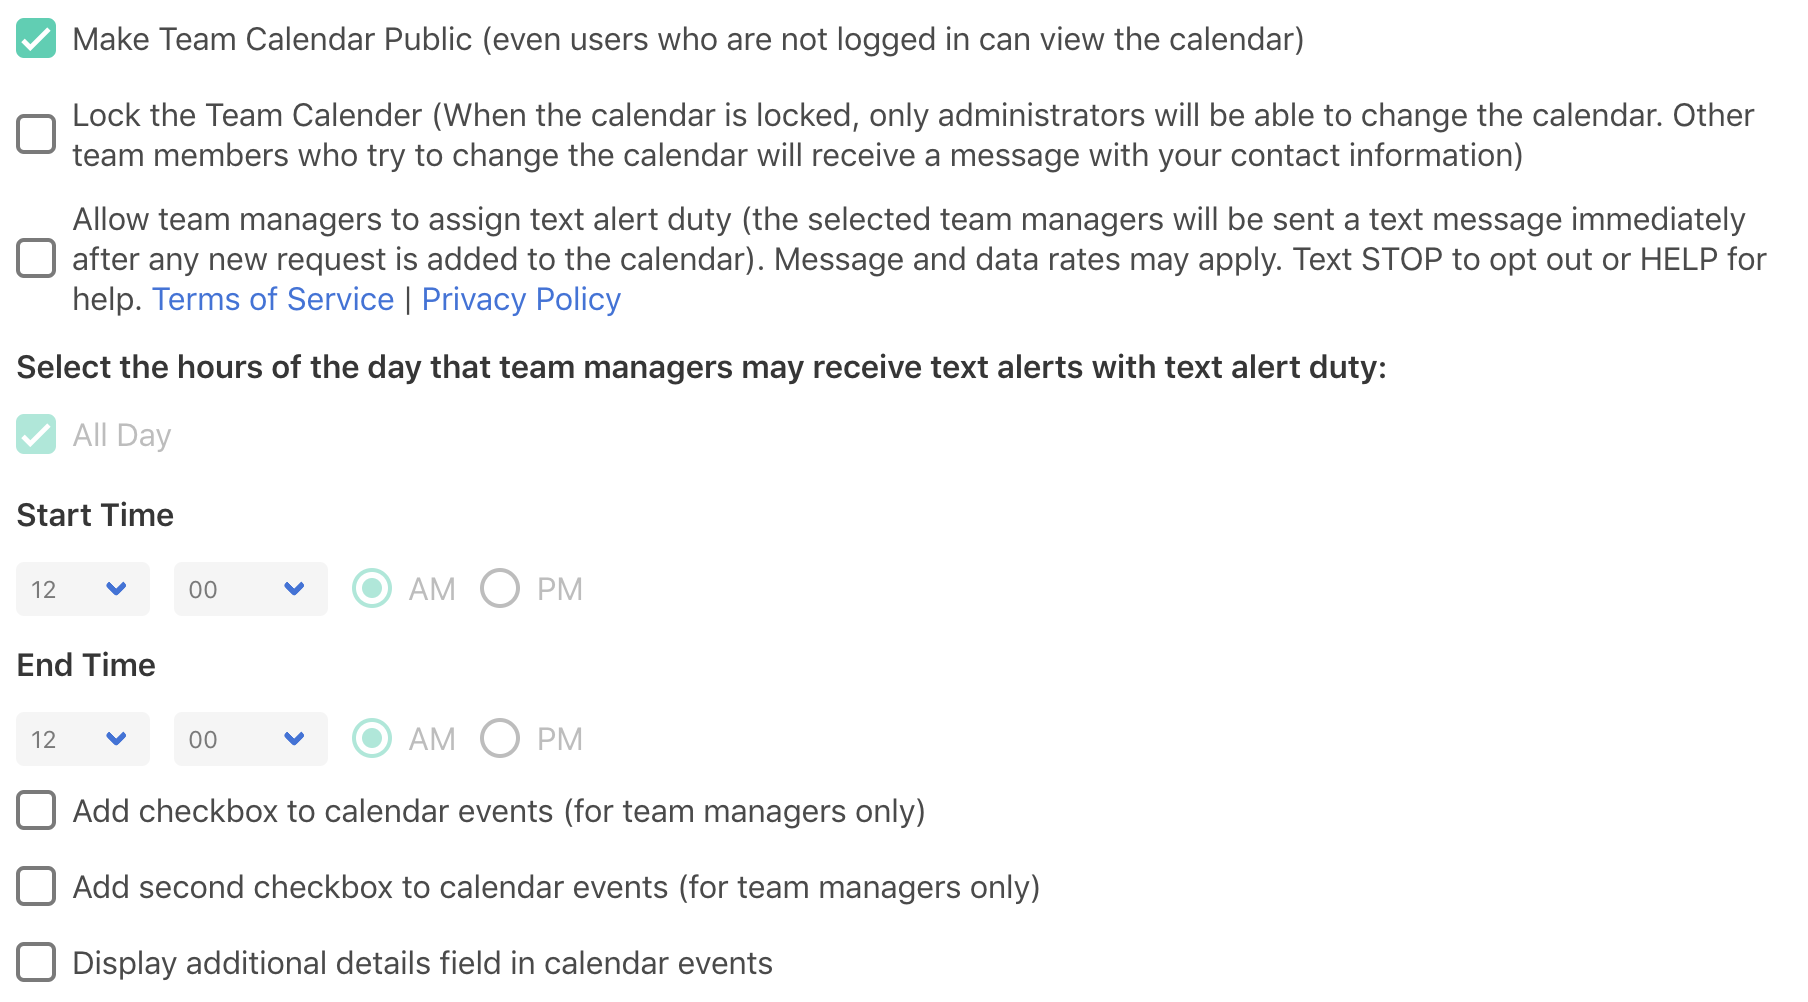
Team Administrators may adjust the Team Settings by choosing this option from the Manage Team menu. A few notes:
- Making the Team Calendar Public means that any person who knows the web address of your team calendar may view the calendar without logging in. Please note that the Internet Subscribed Calendars (.ics files) used to sync your calendar with your computer/device are always publically availalbe to whomever knows their internet addresses. If this is a problem please do not hesitate to contact customer support.
- Locking the Team Calendar is a temporary measure to prevent non-Administrators from editing the calendar (see Backups / Locking Calendar for more details).
- Text Alert Duty will allow selected Team Managers to receive text messages immediately when any request is added to the calendar. This option can be used for teams where approving or denying requests is required within a short amount of time. For more details, see Text Alert Duty.
- You can enable one or two checkboxes before each calendar event (for Team Managers only)
- You may enable another Additional Details field for calendar events, and you may specify the default text that appears in these fields with new events.
- Excel file format backups are also automatically created on a daily basis. You may use the excel file to see what items were on your calendar on a given date.
Once logged in, Team Administrators can add Team Members to the team. Select Team Members from the Manage Team menu. Click Add Team Member to add your first Team Member. You will be prompted for the email address. A few notes:
- You may either specify the user's new password or let us assign them a temporary password.
- Users may have Assistants. The Assitant can automatically receive notifications of calendar changes for the User. If your user doesn't have an assistant, just leave these fields blank.
- Make sure the "Team Member is actively participating" box is checked. If you uncheck this box, you will not be able to add new assignments for the Team Member to the calendar (but they will still be able to log in and view the calendar).
- The Title or Position field is for descriptive purposes only.
- You will specify the Team Member's role. Managers can approve and deny Requests (for example, requests for "OFF"). Administrators can also add and remove jobs and team members.
- Choose a unique Short Name and Initials for each team member. This will help display the calendar in a compact format.
- Choose whether you want the Team Member to receive SMS/Text alerts the morning of that assignment ("Alert: you have ONCALL Monday, July 1"). Please note that this only applies to jobs that have SMS/Text alerts turned on. You may also choose to receive SMS/Text alerts the day before the assignment for jobs that have this option enabled.
- Please choose whether you would like email reminders of your assignments the day before the assignment.
- Certain Team Members may want to be alerted of any change to the calendar within the near future (for instance, any change to any team member's assignments within 7 days).
- You should generally leave the "Enable receiving emails..." options in the Opt Out section checked.
- Once you are through creating your Team Member, they will receive an email with instructions on how to log in.
It's time to create some Jobs! A Job can be a certain duty (for example, "ONCALL") but it can also be any other type of event (for example, "OUT"). From the Manage Team menu, select Jobs. Click Add Job to enter the data.
- Most of these options are fairly self-explanatory, and you can always change them later. You can specify whether Team Members can add, delete, request, or swap their own assignments. Team Managers and Team Administrators can always do these things on behalf of any team member.
- Specify whether team members can recieve SMS/Text reminders the day of or the day before the assignment (at the time they set in their own Preferences). There are certain jobs (for example, OUT) where you do not want to send a SMS/Text on that day (for example, so your Team Member can sleep in!)
- You can specify that a Job needs Coverage. This will allow you to assign another Team Member to "cover" the Team Member with this job, and they can receive an email or text reminder about that event.
- Make sure to click that the job is active. Inactive jobs remain on the calendar but new assignments with that job can not be created.
- If you are going to use our ScheduleMaker Service, you can specify the maximum number of shifts to assign someone in a given length of time. For instance, if you want a team member to be assigned no more than three shifts per month, use 3 for the number of shifts and 30 for the number of days.
- If a job generally has a start and end time, you can specify the default times for that job here.
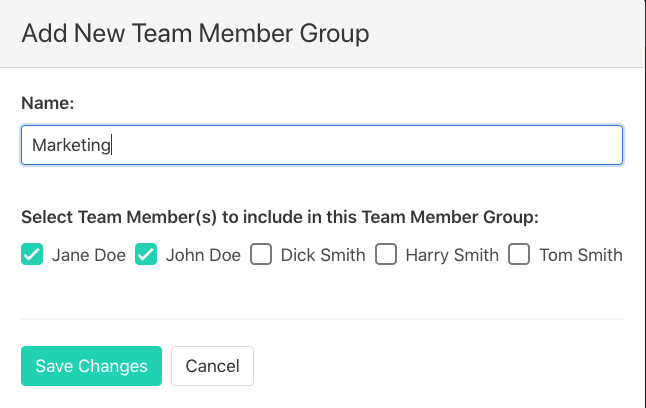
Team Administrators can organize your team members and jobs into groups. This can facilitate selecting team members/jobs (in many places you can specify the team member/job group and then only those team members/jobs in the group will appear as options). You may also create Calendar Views that only show events for that team member group or job group. To create or manage these groups, choose Team Member Groups or Job Groups from the Manage Team menu.

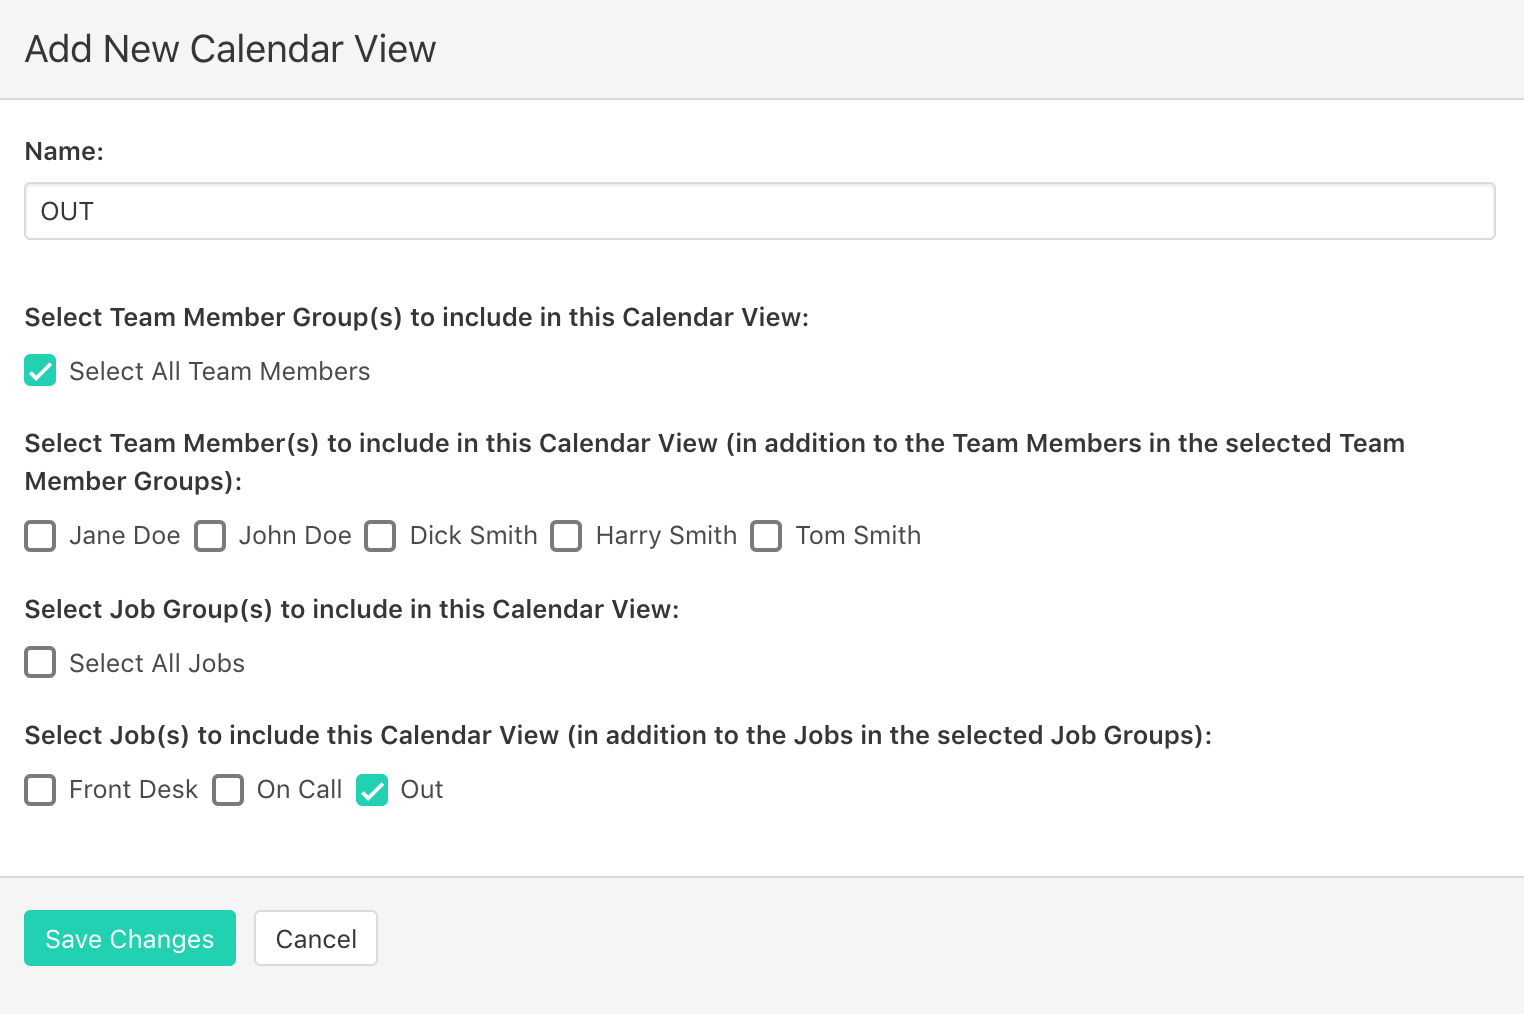
Calendar Views are a way to filter the calendar to display only the data that you would like to see. You can show only a particular Team Member's events, events for a certain set of Jobs, or events filtered by a combination of Team Member(s) and Job(s). You may click on Add/Modify Calendar Views (or choose Calendar Views from the Manage Team menu) to create customized filters.
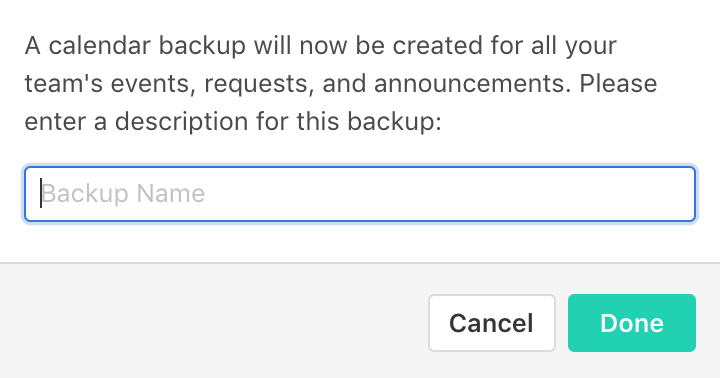
Choose Backups from the Manage Team menu to create backups of all of the items on your Team Calendar. To make a new Backup, choose Create New Backup. Please note that the total number of backups per team is limited and you may have delete an older backup to make room for a newer one. It will take a few minutes to complete the backup process, so you will have to click the Refresh button in your browser.
The entire database is also automatically backed up on a daily basis.

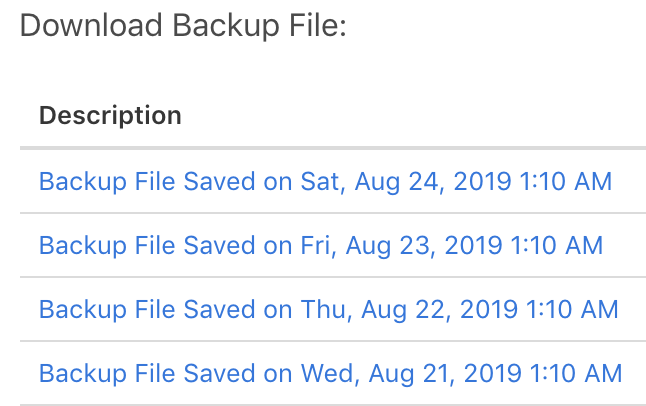
To restore a backup, click Restore. All your current calendar items and swap requests will be deleted and replaced with the backup.
Excel file format backups are also automatically created on a daily basis. Any team member may access these by selecting the Team Information dropdown menu under your Team Name in the menubar. You may use the excel file to see what items were on your calendar on a given date.

Team Administrators may choose to lock the calendar. This will prevent any one else (all non-Administrators) from making changes to the calendar while the Administrator is working on the team schedule. Other team members will receive an alert that the calendar has been locked when they attempt to access it. To lock the calendar, click the checkbox after selecting Team Settings from the Manage Team menu.
An Administrator may choose to Lock the calendar, make a Backup, make changes, and then restore the backup if they would like to "reset" the calendar to the time before they made the changes.
If you are tired of spending hours and hours manually creating schedules for your team, consider using our ScheduleMaker Service. From the Manage Team menu, select ScheduleMaker. Here you will find details about your team's custom created schedules, or send us a message if you are interested in signing up for this service. Our team will guide you through the process of approving/denying requests and then using computer algorithms to create a schedule that gives everyone an equal share of assignments while keeping customized ScheduleMaker Rules that you will set for your team (for instance, avoiding doing a certain Job two days in a row).
For details about the step-by-step process of using the ScheduleMaker Service, click here.
Staff Requirements are used for calculating ScheduleMaker Schedules. If the number of Staff required for a Job varies from day to day, you can specify how many slots there are per day so that we can fill all of them when calculating your team's schedule. For example, if you are running a restaurant and normally need 2 waitresses on the weekdays but 4 waitresses on the weekends, you can add a Staff Requirement of 2 for the Waitress job on Monday - Friday and 4 on Saturday - Sunday. Please note that Staff Requirements are optional; if you always require the same amount of staff each day then there is no need to add Staff Requirements to the calendar.
If you do not specify a Staff Requirement on a particular day, we will assign one person to fill that job on that day. If you do not want any Team Members scheduled on that day, assign a Staff Requirement of 0 on that day.
Staff Requirements are added and manipulated just like other calendar events. You can also add a repeating Staff Requirement.
Did someone change the calendar and you need to track down who did it?
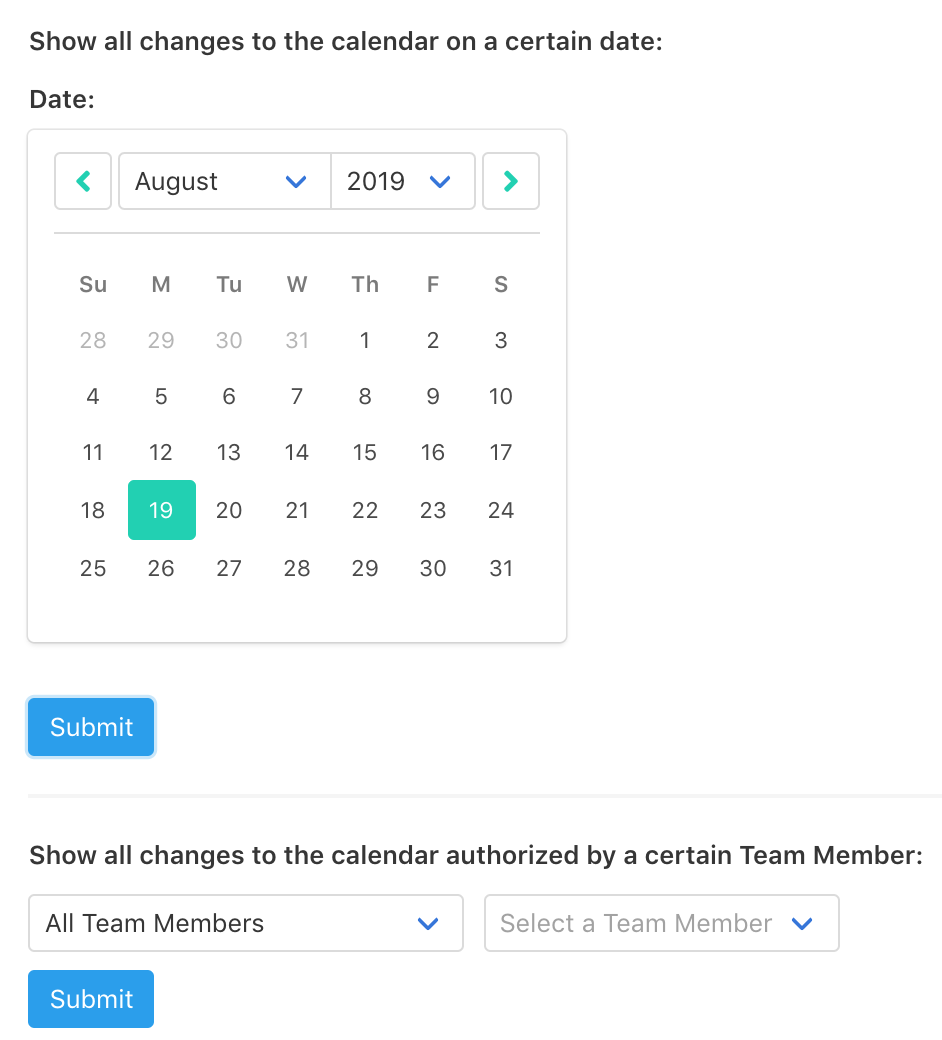
When changes to the calendar are made, Team Administrators can easily determine who made those changes. Simply go to Track Calendar Changes from the Manage Team menu. You can then choose to see all changes to the calendar for a certain date, or all the changes that a certain Team Member made on any date.
Does your team have any customized requests for their calendar? Contact us and we will be happy to provide a quote.
We can provide the following services:
- Add team members in bulk by importing excel/csv files
- Import your team calendar from other sources from a variety of formats
- Create the most fair and optimal schedule for your team with our ScheduleMaker Service
- Create customized rules and computer algorithms that will assist in creating your team's schedules
- Create custom notifications that alert certain team members of specific types of changes to the calendar
- And much more!!
Welcome to What's My Job Today!!
This QuickStart will get you up and running in no time flat. But first of all- HELP! The HELP menu is always at the top right corner of your screen (once you are logged in). You can use this to contact customer support with any issues. We will also be happy to provide you with Team Setup Services- we can take an excel file and import all your Team Members, etc.
For Team Administrator Only: If you are the team's administrator and haven't already registered, please go to https://admin.whatsmyjobtoday.com/register to create your first team. The Admin Console (https://admin.whatsmyjobtoday.com/login) is where you can manage your team and team billing (credit card data). You must subscribe here and enter a valid credit card before your team is created. You may choose from a number of subscription plans. The Basic plan is a good place to start; we can always bill you separately for extra features (such as the ScheduleMaker service). If you are interested in one of the higher level plans, please contact us before signing up.
For All Team Members: To log in, go to https://whatsmyjobtoday.com/login and enter your username (email address) and password (it will be the same password you used on the Admin Console or a temporary password that we emailed you.) If you forgot your password, just click the Forgot Password link and a new one will be emailed to you.
What's My Job Today is based upon the concept of a Job (sometimes also called an Assignment). A Job is simply a Team Member's duty for that day. For example, a Job could be ONCALL - the Team Member would then be on "call" and available to answer phone messages, etc. A Job could also be "OFF" or "OUT" meaning that the Team Member is not working that day. You will be able to assign other Team Members to "cover" another Team Member with a certain Job (for example, a Team Member can cover another Team Member who is OUT).
The calendar is organized into Events, Requests, Announcements, and Staff Requirements. An event (or assignment) is when a Team Member is assigned to a certain Job on a certain day. A Request is when a Team Member is requesting a certain job on a certain day (and you can also request an "OFF" Job if you created that Job). Team Members may also request NOT to have a job on a certain day. An Announcement is a general message (for example, "Office Closed") that will be emailed to all the Team Members on the day prior to the announcement (and it will also be displayed on the calendar). Finally, a Staff Requirement is an optional entry where Team Administrators can specify the number of Team Members needed to do a certain Job on a certain Day.
Once logged in, Team Administrators can add Team Members to the team. Select Team Members from the Manage Team menu. Click Add Team Member to add your first Team Member. You will be prompted for the email address. A few notes:
- You may either specify the user's new password or let us assign them a temporary password.
- Users may have Assistants. The Assitant can automatically receive notifications of calendar changes for the User. If your user doesn't have an assistant, just leave these fields blank.
- Make sure the "Team Member is actively participating" box is checked. If you uncheck this box, you will not be able to add new assignments for the Team Member to the calendar (but they will still be able to log in and view the calendar).
- The Title or Position field is for descriptive purposes only.
- You will specify the Team Member's role. Managers can approve and deny Requests (for example, requests for "OFF"). Administrators can also add and remove jobs and team members.
- Choose a unique Short Name and Initials for each team member. This will help display the calendar in a compact format.
- Choose whether you want the Team Member to receive SMS/Text alerts the morning of that assignment ("Alert: you have ONCALL Monday, July 1"). Please note that this only applies to jobs that have SMS/Text alerts turned on. You may also choose to receive SMS/Text alerts the day before the assignment for jobs that have this option enabled.
- Please choose whether you would like email reminders of your assignments the day before the assignment.
- Certain Team Members may want to be alerted of any change to the calendar within the near future (for instance, any change to any team member's assignments within 7 days).
- You should generally leave the "Enable receiving emails..." options in the Opt Out section checked.
- Once you are through creating your Team Member, they will receive an email with instructions on how to log in.
It's time to create some Jobs! A Job can be a certain duty (for example, "ONCALL") but it can also be any other type of event (for example, "OUT"). From the Manage Team menu, select Jobs. Click Add Job to enter the data.
- Most of these options are fairly self-explanatory, and you can always change them later. You can specify whether Team Members can add, delete, request, or swap their own assignments. Team Managers and Team Administrators can always do these things on behalf of any team member.
- Specify whether team members can recieve SMS/Text reminders the day of or the day before the assignment (at the time they set in their own Preferences). There are certain jobs (for example, OUT) where you do not want to send a SMS/Text on that day (for example, so your Team Member can sleep in!)
- You can specify that a Job needs Coverage. This will allow you to assign another Team Member to "cover" the Team Member with this job, and they can receive an email or text reminder about that event.
- Make sure to click that the job is active. Inactive jobs remain on the calendar but new assignments with that job can not be created.
- If you are going to use our ScheduleMaker Service, you can specify the maximum number of shifts to assign someone in a given length of time. For instance, if you want a team member to be assigned no more than three shifts per month, use 3 for the number of shifts and 30 for the number of days.
- If a job generally has a start and end time, you can specify the default times for that job here.
Once you have created Team Members and Jobs, you can add Events and Requests to the Calendar. Click on your Team Name at the top left corner of the menu to display this month's calendar. Hover over a day and click + Event (or + Ev if you are an Administrator). You may modify existing events just by clicking on them.
Here you will be able to select the Job and Team Member for the event. If the Job Type supports covering team members, you may assign someone to cover this event. You may also change the date, start/end time, and add a note or more extensive details. To make the event repeat every day for one week (for example, if the job is OUT and you want to mark the Team Member OUT for an entire week) click Enter Range of Dates and select the last day of the week. You may also select a Repeating Event Option to have the event automatically repeat every week, month, or year. When you delete one event that is part of a repeating event series (or range of dates), you will have the option to delete all future events in that series. By default, the Team Member(s) involved in this event will receive an email when it is added to the calendar. To disable this, uncheck the Notify By Email box at the bottom.
The day before an event, an email will be automatically sent out to each Team Member (and Covering Team Member) involved, unless they have email alerts turned off. Team Members may also receive SMS/Text alerts for events with Job Types that have that enabled.
To request an assignment, hover over the date you want and click + Request (or + Rq). The options here will be similar to Adding Events. You may check a box that says that you are requesting NOT to have this assignment on this day. The ScheduleMaker Service will not assign you this Job if you have added that to the calendar. You may also specify a Priority and a temporary Message to the Team Manager (these will be deleted when the request is approved.)
Team Managers and Administrators will receive weekly update emails about pending requests that have not been approved or denied. In addition, the total number of Pending Requests will appear at the bottom right of the screen for Team Managers and Administrators.
Team Managers and Administrators may click on a request to approve or deny that request. A dialog box will open allowing you to enter details for the approved event (or the reason for the denial). Once again, click on Notify By Email to alert the Team Member of your decision.
The final type of item that can be added to the calendar is the Announcement. Announcement alerts (for example, "Office Closed") will be emailed out to the entire team the day before the announcement.
Staff Requirements are used for calculating ScheduleMaker Schedules. If the number of Staff required for a Job varies from day to day, you can specify how many slots there are per day so that we can fill all of them when calculating your team's schedule. For example, if you are running a restaurant and normally need 2 waitresses on the weekdays but 4 waitresses on the weekends, you can add a Staff Requirement of 2 for the Waitress job on Monday - Friday and 4 on Saturday - Sunday. Please note that Staff Requirements are optional; if you always require the same amount of staff each day then there is no need to add Staff Requirements to the calendar.
If you do not specify a Staff Requirement on a particular day, we will assign one person to fill that job on that day. If you do not want any Team Members scheduled on that day, assign a Staff Requirement of 0 on that day.
Staff Requirements are added and manipulated just like other calendar events. You can also add a repeating Staff Requirement.
There are options for viewing the calendar near the top of the screen. You may view calendar events only for a certain Team Member by clicking Show All Events and then selecting that Team Member.
You may also select a Monthly, Daily, or Today display option for the calendar.
QuickAdd and QuickRemove are efficient ways to add/remove events in bulk. To do this, first select the Jobs from the checkboxes at the top of the screen. Then, select the Team Member from the column at the left of the screen (along with other details for the event). Hover over the date you want and the appropriate job column, and click + Event. The event will be added to the calendar in one click! You may want to leave the Notify By Email checkboxes UNCHECKED in the left sidebar.
To edit the details for an event, just click on it. A dialog box will allow you to change the date, time, details, or delete the event.
Team Members may adjust their User Profile by clicking Preferences at the top right corner of the screen. The options are similar to the options when you created a new Team Member.
Team Managers and Administrators have a few extra options in the Preferences section: they can choose to recieve and email or SMS/Text message immediately when new requests are entered into the calendar, and they can recieve daily or weekly updates of pending requests or uncovered events.
If you would like to sync your events to your personal smartphone or computer, choose Sync Calendar to Your Device from the Help menu at the top right of the screen. Here you may copy the .ics file (Internet Subscribed Calendar) address, and there are instructions for how to use that with various phones and operating systems.
If you are tired of spending hours and hours manually creating schedules for your team, consider using our ScheduleMaker Service. From the Manage Team menu, select ScheduleMaker. Here you will find details about your team's custom created schedules, or send us a message if you are interested in signing up for this service. Our team will guide you through the process of approving/denying requests and then using computer algorithms to create a schedule that gives everyone an equal share of assignments while keeping customized ScheduleMaker Rules that you will set for your team (for instance, avoiding doing a certain Job two days in a row).
This concludes the QuickStart Tutorial. Happy Scheduling!
Once you have created Team Members and Jobs, you can add Events and Requests to the Calendar. Click on your Team Name at the top left corner of the menu to display this month's calendar. Hover over a day and click + Event (or + Ev if you are an Administrator). You may modify existing events just by clicking on them.
Here you will be able to select the Job and Team Member for the event. If the Job Type supports covering team members, you may assign someone to cover this event. You may also change the date, start/end time, and add a note or more extensive details. To make the event repeat every day for one week (for example, if the job is OUT and you want to mark the Team Member OUT for an entire week) click Enter Range of Dates and select the last day of the week. You may also select a Repeating Event Option to have the event automatically repeat every week, month, or year. When you delete one event that is part of a repeating event series (or range of dates), you will have the option to delete all future events in that series. By default, the Team Member(s) involved in this event will receive an email when it is added to the calendar. To disable this, uncheck the Notify By Email box at the bottom.
The day before an event, an email will be automatically sent out to each Team Member (and Covering Team Member) involved, unless they have email alerts turned off. Team Members may also receive SMS/Text alerts for events with Job Types that have that enabled.
To request an assignment, hover over the date you want and click + Request (or + Rq). The options here will be similar to Adding Events. You may check a box that says that you are requesting NOT to have this assignment on this day. The ScheduleMaker Service will not assign you this Job if you have added that to the calendar. You may also specify a Priority and a temporary Message to the Team Manager (these will be deleted when the request is approved.)
Team Managers and Administrators will receive weekly update emails about pending requests that have not been approved or denied. In addition, the total number of Pending Requests will appear at the bottom right of the screen for Team Managers and Administrators.
You may click "Enter range of dates" to make a calendar item repeat every day for a specified amount of time. Enter the End Date and a series of calendar items will be added to the calendar. If you have a Job named OUT, a team member could mark themselves OUT for an entire week using this method.
To make an item repeat every week or month, select one of the Repeat Options when adding the item to the calendar. You can specify an end date or click No End Date to have the item repeat indefinitely.
When you click on an item that is part of a repeating series of items, you will see this description. When you modify or delete this item, you will be asked if you would like to modify/delete this item only, or all items in the series.
You may choose to filter the calendar to display only certain Team Members, or an Administrator may create a Calendar View that displays only certain Team Members and certain Jobs.
When viewing the calendar, you may click the Display Options button at the top right of the calendar to adjust Calendar View Options. From here you can choose whether to show weekend days and the format of Team Member names (Full names, short names, or just initials). You can specify whether to prioritize sorting events by the job tag or by the time of the event.
You may download a PDF file of the currently displayed calendar by clicking on the PDF button at the top right of the calendar. Only the events that are currently displayed on your screen will be shown. Choose the number of months to print and the name of the file. It may be useful to email a PDF copy of the calendar to your Team Members.
You may choose to view a Monthly Calendar, Daily Calendar, or Today View.
The List View shows one calendar event or request per line. To add a new item, hover your mouse in the left hand column that displays the date. You may quickly edit the notes or details for a particular item simply by clicking the mouse in the notes or details column.
QuickAdd and QuickRemove are efficient ways to add/remove events in bulk. To do this, first select the Jobs from the checkboxes at the top of the screen. Then, select the Team Member from the column at the left of the screen (along with other details for the event). Hover over the date you want and the appropriate job column, and click + Event. The event will be added to the calendar in one click! You may want to leave the Notify By Email checkboxes UNCHECKED in the left sidebar.
To edit the details for an event, just click on it. A dialog box will allow you to change the date, time, details, or delete the event.
QuickAdd and QuickRemove are efficient ways to add/remove events in bulk. To do this, first select the Jobs from the checkboxes at the top of the screen. Then, select the Team Member from the column at the left of the screen (along with other details for the event). Hover over the date you want and the appropriate job column, and click + Event. The event will be added to the calendar in one click! You may want to leave the Notify By Email checkboxes UNCHECKED in the left sidebar.
To edit the details for an event, just click on it. A dialog box will allow you to change the date, time, details, or delete the event.
Any Team Member can view the Job Totals for the team. A Job Total is the total amount of time the Team Member has been assigned that particular job in the dates you specify. Adjusted Job Totals are the total amount of time since the calendar began, plus or minus any offsets you assign that team member.
Adjusted Job Totals are used for calculating ScheduleMaker Schedules. For example, suppose that every month you are making a schedule for the Job "ONCALL," and you want every Team Member to be assigned an equal number of shifts over time. If a Team Member has recently joined the team, you will need to give them "credit" for the time the other Team Members have been doing ONCALL shifts (if each Team Member has already done about 5 shifts, and the new Team Member has done 0 shifts, you will want to give the new Team Member an "offset" of 5 shifts before the next month of the schedule is created).
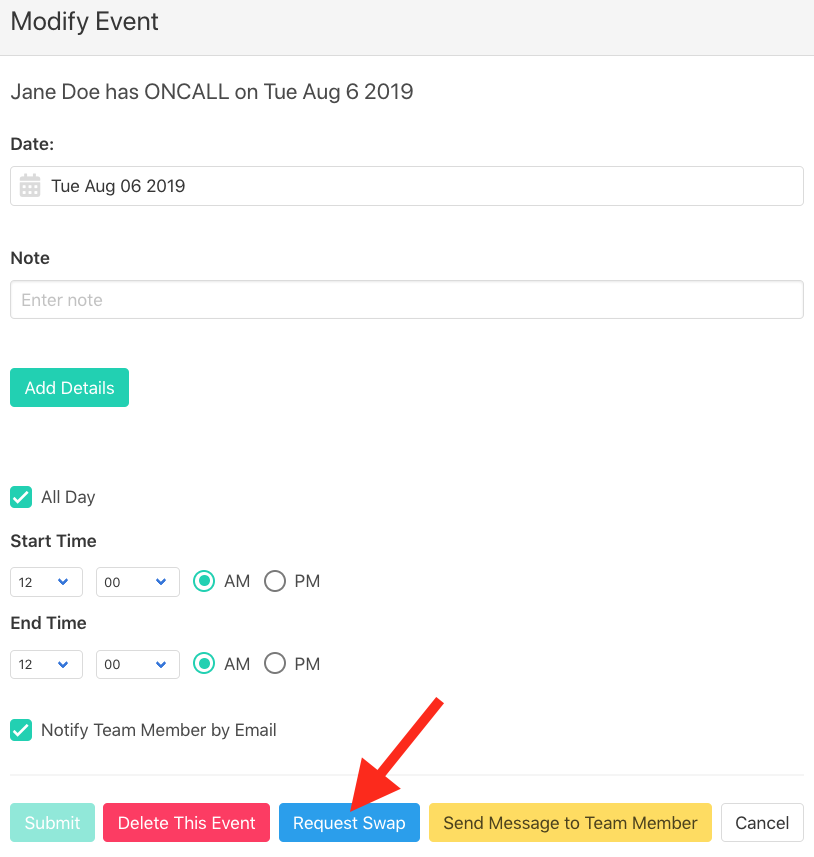
John is on call August 7th but he would like to swap his call with Jane (who is on call August 6th). First, the Team Administrator needs to make sure that the ONCALL job has the Swap Request Option activated (go to Manage Team -> Jobs and edit the options for the ONCALL Job.) To do this, John should click on BOTH EVENTS and choose "Request Swap."
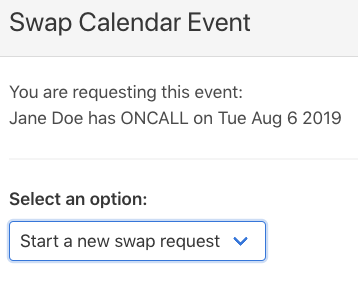
After John clicks on the FIRST event he should choose Start a New Swap Request. He can enter a reason for the request that will be sent to Jane.
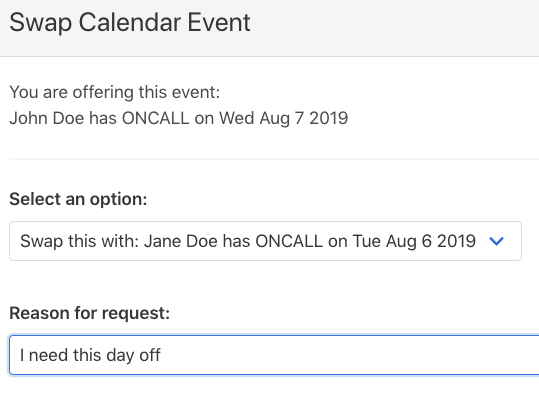
John then clicks on the SECOND event and chooses Request Swap. Then, pick the FIRST event from the "Select an option" dropdown. Jane and John will then receive emails every day until this Swap Request is accepted or rejected.
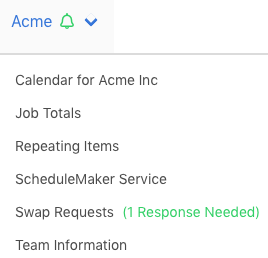
Now we are logged in as Jane. There is a bell icon next to the Team Name in the menu at the top of the screen. Select Swap Requests from this dropdown menu.
On this page are listed the Incoming, Outgoing, and Recent Swap Requests. Jane may click Accept or Reject on this request. If John goes to this webpage, he may delete or modify the request from here (it would be listed as an Outgoing request for John).
Team Administrators may edit the options for the ONCALL Job in the Manage Team -> Jobs menu. You may choose whether a Swap requires approval by a Team Manager or Administrator. If a Swap Request requires approval, the Team Administrators and Managers will recieve an email once Jane accepts the request, and they can approve Swap Requests for the entire team by selecting "Swap Requests for Entire Team" from the Manage Team menu.
The Help menu is available at the top right corner of the screen.
From here, you can type your question or request and click Contact Customer Support. If there is an urgent matter, just check the box next to "This is an urgent request."
Click the Preferences link in the Menu at the top right of the screen to adjust your settings. A few notes:
- You may enter information for an assistant (with their permission). The Assitant can automatically receive notifications of your calendar changes. If you don't have an assistant, just leave these fields blank.
- Make sure the "Team Member is actively participating" box is checked. If you uncheck this box, you will not be able to add new items to the calendar (although you will still be able to log in and view the calendar).
- The Title or Position field is for descriptive purposes only.
- Each Team Member has a role. Managers can approve and deny Requests (for example, requests for "OFF"). Administrators can also add and remove jobs and team members.
- Each team member must have a unique Short Name and Initials. This will help display the calendar in a compact format.
- Choose whether you want to receive SMS/Text alerts the morning of that assignment ("Alert: you have ONCALL Monday, July 1"). Please note that this only applies to jobs that have SMS/Text alerts turned on. You may also choose to receive SMS/Text alerts the day before the assignment for jobs that have this option enabled.
- Please choose whether you would like email reminders of your assignments the day before the assignment.
- Certain Team Members may want to be alerted of any change to the calendar within the near future (for instance, any change to any team member's assignments within 7 days).
- Your team may enable some custom fields at the bottom of the screen.
- You should generally leave the "Enable receiving emails..." options in the Opt Out section checked.
To learn how to sync your online calendar to your smartphone or computer, select Sync Calendar to your device from the Help menu at the top right of your screen.
This section also contains instructions on how to add your team calendar as a button to your smartphone or tablet's home screen.
Users can belong to multiple teams on What's My Job Today.
The currently selected team is displayed in the top left corner of the screen in the Menu. To change your currently selected team, hover over this menu and select the new team from the dropdown menu.
When you click on certain links (including your Preferences), certain options only apply to the currently selected team.
The final type of item that can be added to the calendar is the Announcement. Announcement alerts (for example, "Office Closed") will be emailed out to the entire team the day before the announcement.
Team Members that are not Managers or Administrators have limited abilities to edit the calendar. You may change the options for a Job and specify whether Team Members may add, update, or delete their own assignments involving that Job.
Team Managers and Administrators can edit other Team Members' assignments just by clicking on them.
Team Managers and Administrators may click on a request to approve or deny that request. A dialog box will open allowing you to enter details for the approved event (or the reason for the denial). Once again, click on Notify By Email to alert the Team Member of your decision.
Team Managers and Administrators will receive an email when a swap request requires approval. You may access the swap requests for the team (as opposed to your personal swap requests) by selecting Swap Requests for Entire Team from the Manage Team menu.
Text Alert Duty can be activated by Team Administrators clicking on Team Settings from the Manage Team menu. Team Administrators and Managers can then go to Text Alert Duty from the Manage Team menu and choose a Team Administrator/Manager to receive immediate SMS/Text message alerts when anyone adds a request to the calendar. More than one Team Administrator/Manager can be selected.
This feature is designed for teams where a quick response to requests is required.
You may also specify the hours of the day to enable this feature (to prevent Team Administrators/Managers from being texted at night, for example).
Team Administrators may adjust the Team Settings by choosing this option from the Manage Team menu. A few notes:
- Making the Team Calendar Public means that any person who knows the web address of your team calendar may view the calendar without logging in. Please note that the Internet Subscribed Calendars (.ics files) used to sync your calendar with your computer/device are always publically availalbe to whomever knows their internet addresses. If this is a problem please do not hesitate to contact customer support.
- Locking the Team Calendar is a temporary measure to prevent non-Administrators from editing the calendar (see Backups / Locking Calendar for more details).
- Text Alert Duty will allow selected Team Managers to receive text messages immediately when any request is added to the calendar. This option can be used for teams where approving or denying requests is required within a short amount of time. For more details, see Text Alert Duty.
- You can enable one or two checkboxes before each calendar event (for Team Managers only)
- You may enable another Additional Details field for calendar events, and you may specify the default text that appears in these fields with new events.
- Excel file format backups are also automatically created on a daily basis. You may use the excel file to see what items were on your calendar on a given date.
Once logged in, Team Administrators can add Team Members to the team. Select Team Members from the Manage Team menu. Click Add Team Member to add your first Team Member. You will be prompted for the email address. A few notes:
- You may either specify the user's new password or let us assign them a temporary password.
- Users may have Assistants. The Assitant can automatically receive notifications of calendar changes for the User. If your user doesn't have an assistant, just leave these fields blank.
- Make sure the "Team Member is actively participating" box is checked. If you uncheck this box, you will not be able to add new assignments for the Team Member to the calendar (but they will still be able to log in and view the calendar).
- The Title or Position field is for descriptive purposes only.
- You will specify the Team Member's role. Managers can approve and deny Requests (for example, requests for "OFF"). Administrators can also add and remove jobs and team members.
- Choose a unique Short Name and Initials for each team member. This will help display the calendar in a compact format.
- Choose whether you want the Team Member to receive SMS/Text alerts the morning of that assignment ("Alert: you have ONCALL Monday, July 1"). Please note that this only applies to jobs that have SMS/Text alerts turned on. You may also choose to receive SMS/Text alerts the day before the assignment for jobs that have this option enabled.
- Please choose whether you would like email reminders of your assignments the day before the assignment.
- Certain Team Members may want to be alerted of any change to the calendar within the near future (for instance, any change to any team member's assignments within 7 days).
- You should generally leave the "Enable receiving emails..." options in the Opt Out section checked.
- Once you are through creating your Team Member, they will receive an email with instructions on how to log in.
It's time to create some Jobs! A Job can be a certain duty (for example, "ONCALL") but it can also be any other type of event (for example, "OUT"). From the Manage Team menu, select Jobs. Click Add Job to enter the data.
- Most of these options are fairly self-explanatory, and you can always change them later. You can specify whether Team Members can add, delete, request, or swap their own assignments. Team Managers and Team Administrators can always do these things on behalf of any team member.
- Specify whether team members can recieve SMS/Text reminders the day of or the day before the assignment (at the time they set in their own Preferences). There are certain jobs (for example, OUT) where you do not want to send a SMS/Text on that day (for example, so your Team Member can sleep in!)
- You can specify that a Job needs Coverage. This will allow you to assign another Team Member to "cover" the Team Member with this job, and they can receive an email or text reminder about that event.
- Make sure to click that the job is active. Inactive jobs remain on the calendar but new assignments with that job can not be created.
- If you are going to use our ScheduleMaker Service, you can specify the maximum number of shifts to assign someone in a given length of time. For instance, if you want a team member to be assigned no more than three shifts per month, use 3 for the number of shifts and 30 for the number of days.
- If a job generally has a start and end time, you can specify the default times for that job here.
Team Administrators can organize your team members and jobs into groups. This can facilitate selecting team members/jobs (in many places you can specify the team member/job group and then only those team members/jobs in the group will appear as options). You may also create Calendar Views that only show events for that team member group or job group. To create or manage these groups, choose Team Member Groups or Job Groups from the Manage Team menu.
Calendar Views are a way to filter the calendar to display only the data that you would like to see. You can show only a particular Team Member's events, events for a certain set of Jobs, or events filtered by a combination of Team Member(s) and Job(s). You may click on Add/Modify Calendar Views (or choose Calendar Views from the Manage Team menu) to create customized filters.
Choose Backups from the Manage Team menu to create backups of all of the items on your Team Calendar. To make a new Backup, choose Create New Backup. Please note that the total number of backups per team is limited and you may have delete an older backup to make room for a newer one. It will take a few minutes to complete the backup process, so you will have to click the Refresh button in your browser.
The entire database is also automatically backed up on a daily basis.
To restore a backup, click Restore. All your current calendar items and swap requests will be deleted and replaced with the backup.
Excel file format backups are also automatically created on a daily basis. Any team member may access these by selecting the Team Information dropdown menu under your Team Name in the menubar. You may use the excel file to see what items were on your calendar on a given date.
Team Administrators may choose to lock the calendar. This will prevent any one else (all non-Administrators) from making changes to the calendar while the Administrator is working on the team schedule. Other team members will receive an alert that the calendar has been locked when they attempt to access it. To lock the calendar, click the checkbox after selecting Team Settings from the Manage Team menu.
An Administrator may choose to Lock the calendar, make a Backup, make changes, and then restore the backup if they would like to "reset" the calendar to the time before they made the changes.
If you are tired of spending hours and hours manually creating schedules for your team, consider using our ScheduleMaker Service. From the Manage Team menu, select ScheduleMaker. Here you will find details about your team's custom created schedules, or send us a message if you are interested in signing up for this service. Our team will guide you through the process of approving/denying requests and then using computer algorithms to create a schedule that gives everyone an equal share of assignments while keeping customized ScheduleMaker Rules that you will set for your team (for instance, avoiding doing a certain Job two days in a row).
For details about the step-by-step process of using the ScheduleMaker Service, click here.
Staff Requirements are used for calculating ScheduleMaker Schedules. If the number of Staff required for a Job varies from day to day, you can specify how many slots there are per day so that we can fill all of them when calculating your team's schedule. For example, if you are running a restaurant and normally need 2 waitresses on the weekdays but 4 waitresses on the weekends, you can add a Staff Requirement of 2 for the Waitress job on Monday - Friday and 4 on Saturday - Sunday. Please note that Staff Requirements are optional; if you always require the same amount of staff each day then there is no need to add Staff Requirements to the calendar.
If you do not specify a Staff Requirement on a particular day, we will assign one person to fill that job on that day. If you do not want any Team Members scheduled on that day, assign a Staff Requirement of 0 on that day.
Staff Requirements are added and manipulated just like other calendar events. You can also add a repeating Staff Requirement.
Did someone change the calendar and you need to track down who did it?
When changes to the calendar are made, Team Administrators can easily determine who made those changes. Simply go to Track Calendar Changes from the Manage Team menu. You can then choose to see all changes to the calendar for a certain date, or all the changes that a certain Team Member made on any date.
Does your team have any customized requests for their calendar? Contact us and we will be happy to provide a quote.
We can provide the following services:
- Add team members in bulk by importing excel/csv files
- Import your team calendar from other sources from a variety of formats
- Create the most fair and optimal schedule for your team with our ScheduleMaker Service
- Create customized rules and computer algorithms that will assist in creating your team's schedules
- Create custom notifications that alert certain team members of specific types of changes to the calendar
- And much more!!